Cakespy: Homemade Thin Mints
You can never have too many hor d'oeuvre recipes, so give Cakespy: Homemade Thin Mints a try. This recipe covers 3% of your daily requirements of vitamins and minerals. This recipe makes 36 servings with 125 calories, 2g of protein, and 6g of fat each. A mixture of salt, peppermint extract, cocoa powder, and a handful of other ingredients are all it takes to make this recipe so tasty. From preparation to the plate, this recipe takes about 45 minutes.
Instructions
1
In a small bowl, whisk together flour, cornstarch, cocoa powder and salt.
Ingredients you will need![Cocoa Powder]() Cocoa Powder
Cocoa Powder![Corn Starch]() Corn Starch
Corn Starch![All Purpose Flour]() All Purpose Flour
All Purpose Flour![Salt]() Salt
Salt
Equipment you will use![Whisk]() Whisk
Whisk![Bowl]() Bowl
Bowl
2
In a large bowl, cream together butter and sugar. With the mixer on low speed, add in the milk and the extracts.
Ingredients you will need![Butter]() Butter
Butter![Cream]() Cream
Cream![Sugar]() Sugar
Sugar![Milk]() Milk
Milk
Equipment you will use![Blender]() Blender
Blender![Bowl]() Bowl
Bowl
3
Mixture will look slightly curdled. Gradually, add in the flour mixture until fully incorporated.
Ingredients you will need![All Purpose Flour]() All Purpose Flour
All Purpose Flour
4
Shape dough into two logs, about 1 1/2 inches in diameter. Wrap each log in plastic wrap and freeze for at least 1 to 2 hours (I did mine overnight), until dough is very firm.
Ingredients you will need![Dough]() Dough
Dough![Wrap]() Wrap
Wrap
Equipment you will use![Plastic Wrap]() Plastic Wrap
Plastic Wrap
6
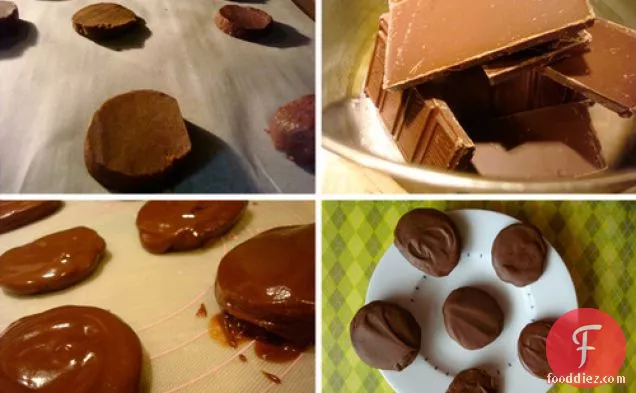
For the most authentic texture, slice dough into rounds not more than 1/4 inch thick (they will not be as crisp if they are thicker, but they're still delicious) and place on a parchment lined baking sheet. Cookies will not spread very much, so you don't have to leave too much space around each one.
Ingredients you will need![Cookies]() Cookies
Cookies![Spread]() Spread
Spread![Dough]() Dough
Dough
Equipment you will use![Baking Sheet]() Baking Sheet
Baking Sheet
7
Bake for 13 to 15 minutes, until cookies are firm at the edges. Cool cookies completely on a wire rack before dipping in chocolate.
Ingredients you will need![Chocolate]() Chocolate
Chocolate![Cookies]() Cookies
Cookies
Equipment you will use![Wire Rack]() Wire Rack
Wire Rack![Oven]() Oven
Oven
8
Prepare the coating. While the original recipe suggested preparing it in the microwave, I did mine on the stovetop by combining the chocolate on butter in a medium saucepan on low heat, stirring frequently until the mixture was melty and fully combined. The texture will be thicker than a chocolate syrup, but not so thick that cookies can't easily be dipped and removed. You can put the chocolate mixture back on heat as needed to keep the coating smooth and easy to dip your cookies into.
Ingredients you will need![Chocolate Syrup]() Chocolate Syrup
Chocolate Syrup![Chocolate]() Chocolate
Chocolate![Cookies]() Cookies
Cookies![Butter]() Butter
Butter![Dip]() Dip
Dip
Equipment you will use![Microwave]() Microwave
Microwave![Sauce Pan]() Sauce Pan
Sauce Pan![Stove]() Stove
Stove
9
Note: Per the recipe I adapted, this can also be done in the microwave: in a microwave safe bowl, combine chocolate and butter. Melt on high power in the microwave, stirring every 45 to 60 seconds, until chocolate is smooth. Chocolate should have a consistency somewhere between chocolate syrup and fudge for a thin coating. (Note: Reheat chocolate as needed to keep it smooth and easy to dip into.)
Ingredients you will need![Chocolate Syrup]() Chocolate Syrup
Chocolate Syrup![Chocolate]() Chocolate
Chocolate![Butter]() Butter
Butter![Fudge]() Fudge
Fudge![Dip]() Dip
Dip
Equipment you will use![Microwave]() Microwave
Microwave![Bowl]() Bowl
Bowl
Equipment


Ingredients
532milliliters![all purpose flour]() all purpose flour118milliliters
all purpose flour118milliliters![butter, room temperature]() butter, room temperature59milliliters
butter, room temperature59milliliters![cornstarch]() cornstarch79milliliters
cornstarch79milliliters![milk (any kind)]() milk (any kind)1teaspoons
milk (any kind)1teaspoons![peppermint extract]() peppermint extract1teaspoons
peppermint extract1teaspoons![salt]() salt283grams
salt283grams![dark or semisweet chocolate (I used Hershey's Special Dark)]() dark or semisweet chocolate (I used Hershey's Special Dark)6Tbsps
dark or semisweet chocolate (I used Hershey's Special Dark)6Tbsps![unsweetened cocoa powder]() unsweetened cocoa powder1teaspoons
unsweetened cocoa powder1teaspoons![vanilla extract]() vanilla extract237milliliters
vanilla extract237milliliters![white sugar]() white sugar
white sugar
 all purpose flour118milliliters
 butter, room temperature59milliliters
 cornstarch79milliliters
 milk (any kind)1teaspoons
 peppermint extract1teaspoons
 salt283grams
 dark or semisweet chocolate (I used Hershey's Special Dark)6Tbsps
 unsweetened cocoa powder1teaspoonsvanilla extract237milliliters
 white sugar
DifficultyExpert
Ready In45 m.
Servings36
Health Score0
Related recipes
Georgia Caviar
Trout with Lime and Thyme
Lena's Swedish Meatballs with Lingonberry Sauce
Mexican Chocolate Martini
Magazine

Your Inner Chef with Taylor Swift's Top 3 Recipes from Her Beloved NYC Hangout

20 Mouthwatering Recipes You Need to Try Today!

Master the Art of Making Perfect Pancakes with This Foolproof Recipe

The Science Behind Red Wine: Its Surprising Health Benefits and Potential Risks

12 Wine Cocktails for a Sophisticated Twist

Sip, Swirl, and Celebrate: Toasting to National Wine Day on May 25th

National Drink Wine Day on February 18

Celebrating Souffle Day with Delectable Delights

Indulge in the Delightful Flavor of Oyster Soup on Its Special Day!

Celebrating World Nutella Day

10 Tasty Ways to Cook Salmon

Foods That Will Never Go Off

10 Tips for Healthier Cooking

Easy Latin American Recipes to Try at Home

How to Make the Perfect Birthday Cake

How to Debone a Chicken

How to Get Started with Healthy Cooking

12 Spring Vegetarian Recipes

15 Tasty Dessert Recipes

20 Best Breakfast Ideas to Enjoy this Spring
Your Inner Chef with Taylor Swift's Top 3 Recipes from Her Beloved NYC Hangout

Celebrate National Pizza Day on February 9th with Mouthwatering Slices and Fun Facts

Indiana's Exciting Addition to the Summer Food Program for School Children

Readers' Top Picks for the Best Restaurant Desserts on National Dessert Day

Artichoke Tomato Pesto Flatbread Recipe A Scrumptious Twist on Savory Classics

Mastering Weeknight Meals with 30 Days of 25-Minute Dinner Recipes

Healthy and Delicious 5-Ingredient Breakfast Recipes

Top 10 Pioneer Woman Recipes of 2023!

From Ropa Vieja to Mojitos Traditional Cuban Cuisine