Strawberry 'Pop Tarts
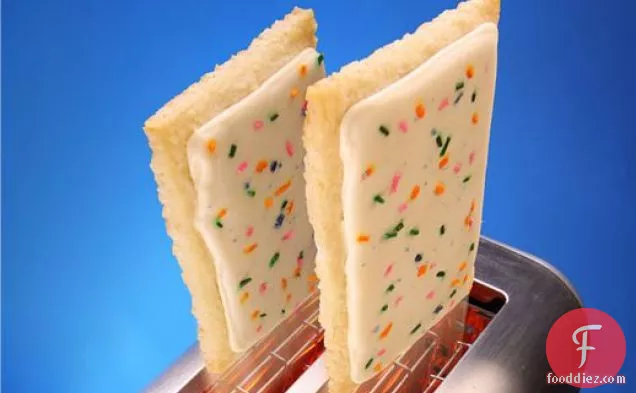
Strawberry 'Pop Tarts might be just the morn meal you are searching for. This recipe makes 12 servings with 414 calories, 3g of protein, and 16g of fat each. This recipe covers 8% of your daily requirements of vitamins and minerals. Head to the store and pick up all purpose flour, freeze strawberries, butter, and a few other things to make it today. It can be enjoyed any time, but it is especially good for Mother's Day. From preparation to the plate, this recipe takes around 2 hours.
Instructions
1
Make the tart dough: With your fingers, cut butter into flour, along with salt, until reduced to pea sized lumps. Next, add corn syrup all at once and mix with a fork until it forms a ball. Dust your hands with a little flour, scoop out the dough, and knead lightly until smooth.Flatten dough into a squarish shape, wrap in plastic, and chill at least 30 minutes.
Ingredients you will need![Corn Syrup]() Corn Syrup
Corn Syrup![Butter]() Butter
Butter![Dough]() Dough
Dough![All Purpose Flour]() All Purpose Flour
All Purpose Flour![Salt]() Salt
Salt![Wrap]() Wrap
Wrap
1
Place a sheet of plastic wrap over a cutting board and set aside. Also have ready a small bowl of water.
Ingredients you will need![Water]() Water
Water![Wrap]() Wrap
Wrap
Equipment you will use![Cutting Board]() Cutting Board
Cutting Board![Plastic Wrap]() Plastic Wrap
Plastic Wrap![Bowl]() Bowl
Bowl
2
Combine dried fruit and corn syrup together in a food processor. Pulse until the fruit has been pureed; stop periodically to scrape the bowl down with a plastic spatula to ensure no chunks of fruit remain. Continue pulsing until an incredibly thick, dough-like paste is formed. Now sprinkle a little water on the plastic wrapped cutting board. Use a spatula to scrape the fruit paste from the processor and on to the cutting board. If you need to use your hands, moisten them with water before touching the fruit paste to prevent sticking.
Ingredients you will need![Dried Fruit]() Dried Fruit
Dried Fruit![Corn Syrup]() Corn Syrup
Corn Syrup![Dough]() Dough
Dough![Fruit]() Fruit
Fruit![Water]() Water
Water
Equipment you will use![Food Processor]() Food Processor
Food Processor![Cutting Board]() Cutting Board
Cutting Board![Spatula]() Spatula
Spatula![Bowl]() Bowl
Bowl
3
Place the fruit paste into center of the plastic wrap and use damp fingers to pat it into a square.
Ingredients you will need![Fruit]() Fruit
Fruit![Wrap]() Wrap
Wrap
Equipment you will use![Plastic Wrap]() Plastic Wrap
Plastic Wrap
4
Sprinkle it with a few drops of water, then put another sheet of plastic wrap on top.Use a rolling pin to roll the paste between the the sheets of plastic; aim for a 12 inch square, about 1/8” thin. Take care to roll evenly, both up-and-down and left-and-right, to maintain a very square-like shape.Gently peel off the top layer of plastic. Use a dampened ruler (it will stick to the paste if you don’t moisten it with water!) to trim the paste into a 12” square. Peel up the scraps and use them to patch together any gaps and to complete the square shape.If necessary sprinkle some more water over the paste, reapply the plastic wrap, and roll a little more. This will seal the patchwork together and ensure the paste is uniformly thin.Use a dampened ruler and a pizza cutter (or knife) to cut out 12, 2 3/4” x 3 3/4” pieces. Don't bother trying to lift or move those pieces, just cut them. Refrigerate the paste, uncovered, until needed (the pieces are easier to handle when cold).
Ingredients you will need![Water]() Water
Water![Roll]() Roll
Roll![Wrap]() Wrap
Wrap
Equipment you will use![Pizza Cutter]() Pizza Cutter
Pizza Cutter![Plastic Wrap]() Plastic Wrap
Plastic Wrap![Rolling Pin]() Rolling Pin
Rolling Pin![Knife]() Knife
Knife
5
Preheat the oven to 350° F and have a parchment lined sheet pan ready.
Equipment you will use![Oven]() Oven
Oven![Frying Pan]() Frying Pan
Frying Pan
6
Roll the dough to a little shy of 1/4” thick. This is important. Each Pop-Tart will ultimately have 4 “layers” (pastry + filling + pastry + icing), so pay close attention to the thickness of each. If you don’t, you may wind up with unreasonably thick Pop-Tarts.Take the chilled squarish lump of dough and set it onto a surface dusted in sifted powdered sugar.
Ingredients you will need![Powdered Sugar]() Powdered Sugar
Powdered Sugar![Dough]() Dough
Dough![Icing]() Icing
Icing![Roll]() Roll
Roll![Pop]() Pop
Pop
7
Roll the dough evenly both left-and-right and up-and-down, but don’t roll diagonally! This will preserve the square shape and minimize re-rolling. Lift and move the dough periodically to make certain it hasn’t stuck, dusting underneath as needed.Once the dough has reached about a 1/4” thickness and an overall square shape, use a ruler to cut it into however-many 3 1/8” wide strips. Then, cut each strip every 4 inches. Gather up any remaining scraps, roll, and cut likewise until you have 24 pieces all together.On half off the pieces, place a rectangle of prepared fruit paste.
Ingredients you will need![Dough]() Dough
Dough![Fruit]() Fruit
Fruit![Roll]() Roll
Roll
8
To seal and bake the tarts: Cover each fruit paste-topped portion with remaining dough pieces. Use the rounded end of a bench knife or your fingers to smooth the dough over the fruit filling and to gently press out any air pockets. Use the handle of a bench knife, the handle of a wooden spoon, or the side of your hand to gently seal the dough along all four sides of each tart. Do not use a fork to crimp the edges; have you ever seen a Pop Tart before? No crimping.Once you’ve smoothly sealed the edges of the Pop-Tart, carefully dock with a fork.Use a bench knife or spatula to transfer the Pop-Tarts to a parchment lined cookie sheet.
Ingredients you will need![Cookies]() Cookies
Cookies![Dough]() Dough
Dough![Fruit]() Fruit
Fruit![Pop]() Pop
Pop
Equipment you will use![Baking Sheet]() Baking Sheet
Baking Sheet![Wooden Spoon]() Wooden Spoon
Wooden Spoon![Dough Scraper]() Dough Scraper
Dough Scraper![Oven]() Oven
Oven![Spatula]() Spatula
Spatula
9
Bake for about 20 minutes, until lightly browned all over. You don’t want them “golden brown” by any means, real Pop-Tarts look downright anemic.Occasionally, a Pop-Tart or two will spread somewhat irregularly during baking. While they’re still warm from the oven, you can trim the edges again quite easily with a bench scraper or knife. Cool thoroughly.
Ingredients you will need![Pop]() Pop
Pop
Equipment you will use![Dough Scraper]() Dough Scraper
Dough Scraper![Oven]() Oven
Oven![Knife]() Knife
Knife
10
Make the frosting and finish the tarts: Use a clean towel or dry pastry brush to dust off the cooled Pop-Tarts, removing any stray crumbs.
Ingredients you will need![Frosting]() Frosting
Frosting![Pop]() Pop
Pop
Equipment you will use![Pastry Brush]() Pastry Brush
Pastry Brush
11
Combine all of the icing ingredients in a bowl and mix until a smooth paste forms. Put some of the icing into a piping bag fitted with a small, plain tip. Pipe a boarder of icing around the perimeter of each tart, leaving about a 1/4” margin.Thin the remaining icing, a tablespoon of water at a time, until it reaches a pourable consistency.
Ingredients you will need![Icing]() Icing
Icing![Water]() Water
Water
Equipment you will use![Bowl]() Bowl
Bowl
Equipment


Ingredients
283grams![all purpose flour]() all purpose flour113grams
all purpose flour113grams![dried apple]() dried apple227grams
dried apple227grams![cold butter, cubed (use shortening for vegan)]() cold butter, cubed (use shortening for vegan)28grams
cold butter, cubed (use shortening for vegan)28grams![corn syrup]() corn syrup2
corn syrup2![egg whites or 2 ounces corn syrup]() egg whites or 2 ounces corn syrup57grams
egg whites or 2 ounces corn syrup57grams![freeze dried strawberries (see note)]() freeze dried strawberries (see note)113grams
freeze dried strawberries (see note)113grams![dried pear]() dried pear340grams
dried pear340grams![powdered sugar]() powdered sugar12servings
powdered sugar12servings![rainbow sprinkles, homemade or store bought]() rainbow sprinkles, homemade or store bought1teaspoons
rainbow sprinkles, homemade or store bought1teaspoons![salt]() salt2teaspoons
salt2teaspoons![vanilla]() vanilla
vanilla
 all purpose flour113grams
 dried apple227grams
 cold butter, cubed (use shortening for vegan)28grams
 corn syrup2
 egg whites or 2 ounces corn syrup57grams
 freeze dried strawberries (see note)113grams
 dried pear340grams
 powdered sugar12servings
 rainbow sprinkles, homemade or store bought1teaspoons
 salt2teaspoons
 vanilla
DifficultyExpert
Ready In2 hrs
Servings12
Health Score2
Dish TypesSide Dish
Related recipes
Strawberry Satin Pie
Strawberry Rhubarb Jam
Cherry Rhubarb Jam
Nutty Fresh Strawberry Salad
Magazine

Your Inner Chef with Taylor Swift's Top 3 Recipes from Her Beloved NYC Hangout

20 Mouthwatering Recipes You Need to Try Today!

Master the Art of Making Perfect Pancakes with This Foolproof Recipe

The Science Behind Red Wine: Its Surprising Health Benefits and Potential Risks

12 Wine Cocktails for a Sophisticated Twist

Sip, Swirl, and Celebrate: Toasting to National Wine Day on May 25th

National Drink Wine Day on February 18

Celebrating Souffle Day with Delectable Delights

Indulge in the Delightful Flavor of Oyster Soup on Its Special Day!

Celebrating World Nutella Day

How to Use Tahini

Basic Cooking Methods Everyone Should Know

The Different Types of Meat

All You Need to Know About the Vegetarian Diet

How to Cook Beetroot

How to Make Great Coffee at Home

How to Cook Cauliflower
How To Keep a Well-Stocked Pantry

Ten Healthy and Budget-Friendly Foods

Foods You Should Freeze to Save Money
Your Inner Chef with Taylor Swift's Top 3 Recipes from Her Beloved NYC Hangout
12 Wine Cocktails for a Sophisticated Twist
Celebrating Souffle Day with Delectable Delights
Indulge in the Delightful Flavor of Oyster Soup on Its Special Day!

These Super Recipes for Your Football Party!

The Secrets Behind 3 Classic Comfort Food Recipes
10 Warming Recipes to Beat the Cold Days

A Collection of 15 Noodle Soup Recipes to Warm Your Soul

The Rich and Flavorful Black Food Traditions in Netflix's 'High on the Hog'