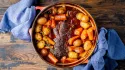
Deep Dish Cherry Pie
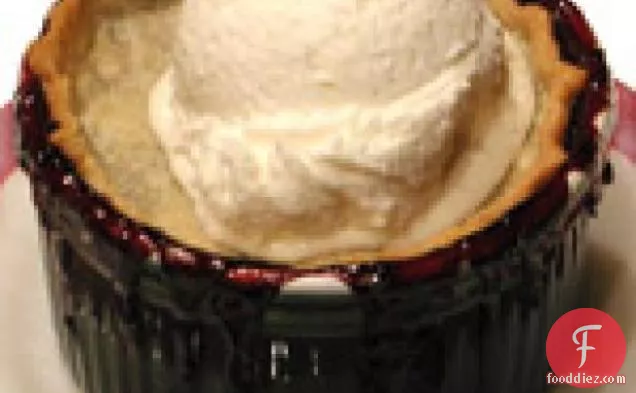
You can never have too many dessert recipes, so give Deep Dish Cherry Pie a try. This recipe serves 8. One portion of this dish contains roughly 11g of protein, 45g of fat, and a total of 880 calories. This recipe covers 16% of your daily requirements of vitamins and minerals. From preparation to the plate, this recipe takes approximately 55 minutes. If you have sugar, cornstarch, sugar, and a few other ingredients on hand, you can make it.
Instructions
1
Roll out the pie dough to 1/8th-inch thick and chill on parchment lined sheet pans.
Ingredients you will need![Pie Dough]() Pie Dough
Pie Dough![Roll]() Roll
Roll
2
Cut out disks of dough 1-inch bigger than your ovenproof 8 to 12 ounce crocks. Keep chilled until ready to use.
Ingredients you will need![Dough]() Dough
Dough
4
Drain the cherry juices into a medium saucepan; you should have about a cup of juice.
Ingredients you will need![Cherries]() Cherries
Cherries![Juice]() Juice
Juice
Equipment you will use![Sauce Pan]() Sauce Pan
Sauce Pan
5
Add the cornstarch, sugar, ginger, and lemon juice and whisk to dissolve the cornstarch then bring it to a simmer over medium heat whisking all the while. When thickened, turn off the heat, stir in the cherries.
Ingredients you will need![Lemon Juice]() Lemon Juice
Lemon Juice![Corn Starch]() Corn Starch
Corn Starch![Cherries]() Cherries
Cherries![Ginger]() Ginger
Ginger![Sugar]() Sugar
Sugar
Equipment you will use![Whisk]() Whisk
Whisk
6
Pour the cherry filling into the ovenproof dishes and set aside to cool slightly. Carefully place the rolled-out disks on top and ease them into the dishes so it doesn't hang over the edge.
Ingredients you will need![Cherries]() Cherries
Cherries
7
Brush each disk with a little heavy cream and then sprinkle lightly with 2 tablespoons of sugar. With the tips of a pair of scissors, snip a X vent hole in the top of each crust.
Ingredients you will need![Heavy Cream]() Heavy Cream
Heavy Cream![Crust]() Crust
Crust![Sugar]() Sugar
Sugar
Equipment you will use![Kitchen Scissors]() Kitchen Scissors
Kitchen Scissors
9
Bake until the crust is golden brown and the juices are bubbling at the vents, 25 to 30 minutes.
Ingredients you will need![Crust]() Crust
Crust
Equipment you will use![Oven]() Oven
Oven
12
In a mixer fitted with a paddle attachment (or using a hand mixer), mix the flour, salt, and sugar for 1 minute.
Ingredients you will need![All Purpose Flour]() All Purpose Flour
All Purpose Flour![Sugar]() Sugar
Sugar![Salt]() Salt
Salt
Equipment you will use![Hand Mixer]() Hand Mixer
Hand Mixer![Blender]() Blender
Blender
13
Add the butter and mix just until you have a crumbly, sandy mixture. You should still be able to see the pieces of butter.
Ingredients you will need![Butter]() Butter
Butter
14
In a small bowl, stir the water and vinegar together. With the mixer running at medium speed, drizzle in the water-vinegar mixture and mix just until a dough forms. You should still see small bits of butter.
Ingredients you will need![Vinegar]() Vinegar
Vinegar![Butter]() Butter
Butter![Dough]() Dough
Dough![Water]() Water
Water
Equipment you will use![Blender]() Blender
Blender![Bowl]() Bowl
Bowl
15
Turn out onto a work surface, divide the dough in half, and shape into round, flat disks. Wrap separately in plastic wrap and refrigerate at least 30 minutes before using. (Or, refrigerate up to 48 hours or freeze up to 1 month before using. If frozen, let thaw in the refrigerator overnight before rolling out.)
Ingredients you will need![Dough]() Dough
Dough![Wrap]() Wrap
Wrap
Equipment you will use![Plastic Wrap]() Plastic Wrap
Plastic Wrap
16
When the time comes to roll out the dough, let the dough warm up for a few minutes at room temperature. Dust a work surface with just a few tablespoons of flour and keep some extra flour at hand. If you like, you can roll out the dough between two sheets of waxed paper (flouring the bottom sheet and the top of the dough before rolling), which makes it much easier to transfer to the pan later on. However, you won't be able to check the progress of the dough as easily. It's entirely up to you.
Ingredients you will need![Dough]() Dough
Dough![All Purpose Flour]() All Purpose Flour
All Purpose Flour![Roll]() Roll
Roll
Equipment you will use![Frying Pan]() Frying Pan
Frying Pan
17
Sprinkle a little flour on top of the dough and start rolling outward from the center with quick, light strokes. Don't worry if the edges split a bit; concentrate on getting a good circle going from the center. Lift up and rotate the dough 1/4 turn every minute or so to help ensure even rolling. The dough should feel smooth and soft; some say it should feel like the inside of your forearm. If it gets sticky, sprinkle on a bit more flour, but don't do this more than two or three times; the dough will absorb too much flour. Instead, put it back in the fridge for 15 minutes to firm the butter up. Keep rolling until the circle is at least 2 inches larger than your pan (for example, 11 inches wide for a 9-inch pie pan), or 3 inches larger for deep-dish pies.
Ingredients you will need![Butter]() Butter
Butter![Dough]() Dough
Dough![All Purpose Flour]() All Purpose Flour
All Purpose Flour
Equipment you will use![Pie Form]() Pie Form
Pie Form![Frying Pan]() Frying Pan
Frying Pan
18
Set your pie or tart pan nearby. We always use heavy aluminum pans, because glass pans seem to bake the crust too fast. However, we know that the advantage of glass is that you can easily check the color of the crust. Again, it's up to you. Either choice will work.
Ingredients you will need![Crust]() Crust
Crust
Equipment you will use![Oven]() Oven
Oven![Tart Form]() Tart Form
Tart Form
19
To transfer the crust to the pan, we find it easiest to roll a finished crust up onto the rolling pin, then gently unroll it in the pan. Or, you can fold it gently in quarters, lift it up, position the center point on the center of the pan, and unfold it into the pan. If using waxed paper, peel off the top layer, turn the crust gently into the pan, and peel off the remaining paper. Make sure that the dough is allowed to settle completely into the pan.
Ingredients you will need![Crust]() Crust
Crust![Dough]() Dough
Dough![Roll]() Roll
Roll
Equipment you will use![Rolling Pin]() Rolling Pin
Rolling Pin![Frying Pan]() Frying Pan
Frying Pan
20
Don't stretch and press the dough into the corners; stretched dough will likely shrink back when you bake it. Instead, lift the edges of the crust to let it settle down into the corners. If the dough tears a bit, don't be concerned; it will patch easily. Using scissors or a sharp knife, trim the dough to within 3/4 inch of the rim. Use any extra scraps to patch the crust, pressing with your fingers (wet them if necessary) or set aside.
Ingredients you will need![Crust]() Crust
Crust![Dough]() Dough
Dough
Equipment you will use![Oven]() Oven
Oven![Kitchen Scissors]() Kitchen Scissors
Kitchen Scissors![Knife]() Knife
Knife
21
For a double-crust pie: Leave the edges of the bottom crust hanging over the rim.
Ingredients you will need![Crust]() Crust
Crust
22
Roll out the second piece of dough into a circle about 11 inches in diameter. Line a sheet pan with parchment or waxed paper.
Ingredients you will need![Dough]() Dough
Dough![Roll]() Roll
Roll
Equipment you will use![Frying Pan]() Frying Pan
Frying Pan
23
Roll the dough up onto the rolling pin, then unroll it onto the sheet pan.
Ingredients you will need![Dough]() Dough
Dough![Roll]() Roll
Roll
Equipment you will use![Rolling Pin]() Rolling Pin
Rolling Pin![Frying Pan]() Frying Pan
Frying Pan
24
Chill the finished crust or crusts for 20 to 30 minutes before filling the pie. When the bottom crust is filled, rest the top crust on top and pinch the edges together, turning them under all the way around. To decorate the rim, just press it all around with the back of a fork. For a slightly more advanced look, press the thumb and forefinger of one hand together. Use them to gently push the thick dough rim outward, while pushing inward with the forefinger of the other hand, so that they intersect in a "V" with the dough in between. Repeat all around the rim to make a wavy edge.
Ingredients you will need![Crust]() Crust
Crust![Dough]() Dough
Dough
25
For a prebaked pie or tart crust (blind baking): Preheat the oven to 375 degrees F. Line the inside of the chilled crust with aluminum foil (don't turn it down over the rim, but leave the extra sticking up so that you have something to hold on to). Fill the foil all the way up to the top of the shell with pie weights or dried beans.
Ingredients you will need![Dried Beans]() Dried Beans
Dried Beans![Crust]() Crust
Crust
Equipment you will use![Aluminum Foil]() Aluminum Foil
Aluminum Foil![Oven]() Oven
Oven
Equipment


Ingredients
907grams![1/4 pounds fresh or thawed frozen cherries, or 2 pie cherries]() 1/4 pounds fresh or thawed frozen cherries, or 2 pie cherries3Tbsps
1/4 pounds fresh or thawed frozen cherries, or 2 pie cherries3Tbsps![cornstarch]() cornstarch1liters
cornstarch1liters![sifted all-purpose flour]() sifted all-purpose flour0teaspoons
sifted all-purpose flour0teaspoons![freshly grated ginger]() freshly grated ginger177milliliters
freshly grated ginger177milliliters![granulated sugar]() granulated sugar59milliliters
granulated sugar59milliliters![heavy cream]() heavy cream118milliliters
heavy cream118milliliters![ice water (strain out the ice just before using)]() ice water (strain out the ice just before using)2teaspoons
ice water (strain out the ice just before using)2teaspoons![kosher salt]() kosher salt1teaspoon
kosher salt1teaspoon![freshly squeezed lemon juice]() freshly squeezed lemon juice2teaspoons
freshly squeezed lemon juice2teaspoons![red wine vinegar]() red wine vinegar2Tbsps
red wine vinegar2Tbsps![sugar]() sugar2teaspoons
sugar2teaspoons![sugar]() sugar340grams
sugar340grams![(3 sticks) cold unsalted butter, cut into pieces]() (3 sticks) cold unsalted butter, cut into pieces1pint
(3 sticks) cold unsalted butter, cut into pieces1pint![vanilla ice cream]() vanilla ice cream
vanilla ice cream
 1/4 pounds fresh or thawed frozen cherries, or 2 pie cherries3Tbsps
 cornstarch1liters
 sifted all-purpose flour0teaspoons
 freshly grated ginger177milliliters
 granulated sugar59milliliters
 heavy cream118milliliters
 ice water (strain out the ice just before using)2teaspoons
 kosher salt1teaspoon
 freshly squeezed lemon juice2teaspoons
 red wine vinegar2Tbspssugar2teaspoonssugar340grams
 (3 sticks) cold unsalted butter, cut into pieces1pint
 vanilla ice cream
DifficultyExpert
Ready In55 m.
Servings8
Health Score6
Dish TypesSide Dish
Related recipes
Buffalo Chicken Fingers with Blue Cheese Dressing
Sausage-Currant Stuffing
Banana-Toffee Drop Scones
Celery Root and Mushroom Stuffing
Magazine

Your Inner Chef with Taylor Swift's Top 3 Recipes from Her Beloved NYC Hangout

20 Mouthwatering Recipes You Need to Try Today!

Master the Art of Making Perfect Pancakes with This Foolproof Recipe

The Science Behind Red Wine: Its Surprising Health Benefits and Potential Risks

12 Wine Cocktails for a Sophisticated Twist

Sip, Swirl, and Celebrate: Toasting to National Wine Day on May 25th

National Drink Wine Day on February 18

Celebrating Souffle Day with Delectable Delights

Indulge in the Delightful Flavor of Oyster Soup on Its Special Day!

Celebrating World Nutella Day

Recipes to Spice Up Your February Menu

These Super Recipes for Your Football Party!
The Secrets Behind 3 Classic Comfort Food Recipes
Celebrating Souffle Day with Delectable Delights
Indulge in the Delightful Flavor of Oyster Soup on Its Special Day!
Celebrating World Nutella Day
The Science Behind Red Wine: Its Surprising Health Benefits and Potential Risks
Sip, Swirl, and Celebrate: Toasting to National Wine Day on May 25th
12 Wine Cocktails for a Sophisticated Twist
National Drink Wine Day on February 18
Your Inner Chef with Taylor Swift's Top 3 Recipes from Her Beloved NYC Hangout
12 Wine Cocktails for a Sophisticated Twist
Celebrating Souffle Day with Delectable Delights
Indulge in the Delightful Flavor of Oyster Soup on Its Special Day!
These Super Recipes for Your Football Party!
The Secrets Behind 3 Classic Comfort Food Recipes
10 Warming Recipes to Beat the Cold Days

A Collection of 15 Noodle Soup Recipes to Warm Your Soul

The Rich and Flavorful Black Food Traditions in Netflix's 'High on the Hog'