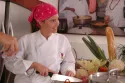
Chocolate Seascape
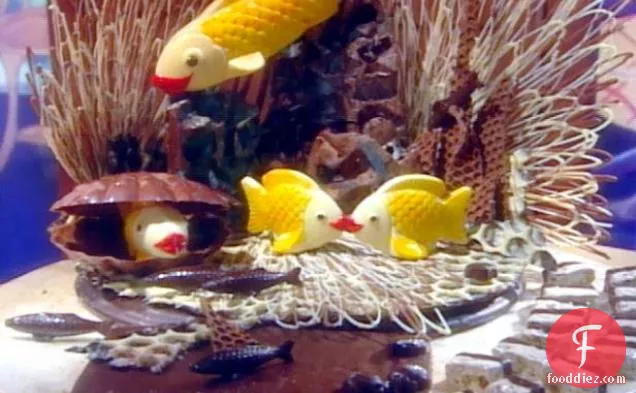
Chocolate Seascape might be just the main course you are searching for. This gluten free and dairy free recipe serves 1. One serving contains 15397 calories, 164g of protein, and 986g of fat. Only A mixture of bittersweet chocolate, powdered food coloring in various colors, cocoa butter, and a handful of other ingredients are all it takes to make this recipe so tasty. To use up the bittersweet chocolate you could follow this main course with the Bittersweet Chocolate Meringues as a dessert. From preparation to the plate, this recipe takes around 5 hours.
Instructions
1
Place a piece of the bubble wrap, bubble side up, on your work surface. Using a large spoon or ladle, randomly drizzle white and bittersweet chocolate onto the plastic. Using an offset spatula, spread the two drizzled chocolates evenly, creating a marbled effect. You can make the base whatever size and shape you'd like it to be, however make sure it is at least 1/4-inch thick.
Ingredients you will need![Bittersweet Chocolate]() Bittersweet Chocolate
Bittersweet Chocolate![Base]() Base
Base![Wrap]() Wrap
Wrap
Equipment you will use![Offset Spatula]() Offset Spatula
Offset Spatula![Ladle]() Ladle
Ladle
2
Pour the untempered bittersweet chocolate over the cubes and let set until the cubes have completely melted.
Ingredients you will need![Bittersweet Chocolate]() Bittersweet Chocolate
Bittersweet Chocolate
3
Remove the chocolate from the container, drain off, and discard the excess water. For the Final Seascape: Arrange the pieces as you would like on the bubble wrap base and "glue" them down using the melted chocolate. If you place all of the pieces in the refrigerator first, the sculpture will set faster, as the cold chocolate will cause the "glue" to harden and set quickly.
Ingredients you will need![Chocolate]() Chocolate
Chocolate![Water]() Water
Water![Base]() Base
Base![Wrap]() Wrap
Wrap
4
How to Temper Chocolate(From Dessert Circus, Extraordinary Desserts You Can Make At Home by Jacques Torres): Chocolate is tempered so that after it has been melted, it retains its gloss and hardens again without becoming chalky and white (that happens when the molecules of fat separate and form on top of the chocolate). There are a variety of ways to temper. One of the easiest ways to temper chocolate is to chop it into small pieces and then place it in the microwave for 30 seconds at a time on high power until most of the chocolate is melted. Be very careful not to overheat it. (The temperature of dark chocolate should be between 88 and 90 degrees F, slightly warmer than your bottom lip. It will retain its shape even when mostly melted. White and milk chocolates melt at a temperature approximately 2 degrees F less because of the amount of lactose they contain.) Any remaining lumps will melt in the chocolate's residual heat. Use an immersion blender or whisk to break up the lumps. Usually, chocolate begins to set, or crystallize, along the side of the bowl. As it sets, mix those crystals into the melted chocolate to temper it. A glass bowl retains heat well and keeps the chocolate tempered longer. Another way to temper chocolate is called seeding. In this method, add small pieces of unmelted chocolate to melted chocolate. The amount of unmelted chocolate to be added depends on the temperature of the melted chocolate, but is usually 1/4 of the total amount. It is easiest to use an immersion blender for this, or a whisk. The classic way to temper chocolate is called tabliering. Two thirds of the melted chocolate is poured onto a marble or another cold work surface. The chocolate is spread out and worked with a spatula until its temperature is approximately 81 degrees F. At this stage, it is thick and begins to set. This tempered chocolate is then added to the remaining non-tempered chocolate and mixed thoroughly until the mass has a completely uniform temperature. If the temperature is still too high, part of the chocolate is worked further on the cold surface until the correct temperature is reached. This is a lot of work, requires a lot of room, and makes a big mess. A simple method of checking tempering, is to apply a small quantity of chocolate to a piece of paper or to the point of a knife. If the chocolate has been correctly tempered, it will harden evenly and show a good gloss within a few minutes.
Ingredients you will need![Dark Chocolate]() Dark Chocolate
Dark Chocolate![Chocolate]() Chocolate
Chocolate![Lactose]() Lactose
Lactose![Spread]() Spread
Spread![Milk]() Milk
Milk
Equipment you will use![Immersion Blender]() Immersion Blender
Immersion Blender![Microwave]() Microwave
Microwave![Spatula]() Spatula
Spatula![Knife]() Knife
Knife![Whisk]() Whisk
Whisk![Bowl]() Bowl
Bowl
5
How to Make a Cornet (From Dessert Circus, Extraordinary Desserts You Can Make At Home by Jacques Torres): The Cornet: A cornet is a small piping bag made from parchment paper. It is usually used to make fine decorations.
Equipment you will use![Baking Paper]() Baking Paper
Baking Paper
6
Cut an 8 by 12 by 14 1/2-inch triangle from a sheet of parchment paper. Hold the middle of the long side of the triangle between two fingers of one hand. Take the tip of the triangle on the short, wide end and roll it toward the other tip of that same end while simultaneously pulling it in an upward motion. The tip of a cone will form where your thumb and finger hold it on the long side. Release your grip from the long side, so that you are now holding the two corners where they meet. The paper will already resemble a partially formed cone.
Ingredients you will need![Roll]() Roll
Roll
Equipment you will use![Baking Paper]() Baking Paper
Baking Paper
7
Roll the remaining tail until it is completely rolled into a cone. There will be one point sticking up from the open end. Fold it inside toward the center, and crease the fold. Now you should have a cornet. To close the cornet once it has been filled, fold it away from the seam; this will keep the seam from opening. Use a pair of scissors or a sharp paring knife to cut an opening at the tip of the cornet to the desired size.
Ingredients you will need![Roll]() Roll
Roll
Equipment you will use![Kitchen Scissors]() Kitchen Scissors
Kitchen Scissors![Knife]() Knife
Knife
Equipment


DifficultyExpert
Ready In5 hrs
Servings1
Health Score70
Related recipes
Grilled Beef Tenderloin with Golden Beet and Blue Cheese Puree
Nutty Cinnamon Rolls
Mozzarella-Stuffed Meatballs
Angel Food Trifle
Magazine

Your Inner Chef with Taylor Swift's Top 3 Recipes from Her Beloved NYC Hangout

20 Mouthwatering Recipes You Need to Try Today!

Master the Art of Making Perfect Pancakes with This Foolproof Recipe

The Science Behind Red Wine: Its Surprising Health Benefits and Potential Risks

12 Wine Cocktails for a Sophisticated Twist

Sip, Swirl, and Celebrate: Toasting to National Wine Day on May 25th

National Drink Wine Day on February 18

Celebrating Souffle Day with Delectable Delights

Indulge in the Delightful Flavor of Oyster Soup on Its Special Day!

Celebrating World Nutella Day

Different Types of Fish and Their Unique Characteristics

Fish and Meat Consumption in Modern Diets

Exploring the World of Meat Delicious Recipes

10 Irresistible Beef Recipes That Will Make Your Taste Buds Dance

Easy and Refreshing August Recipes

September Recipes to Try at Home
Rich Food Culture of the Middle East

The Roadmap to Self-Taught Cooking Excellence
Discover the 5 Essential Basics for Every Home Chef
A Quick and Easy Guide to Cooking Fast Food at Home
Your Inner Chef with Taylor Swift's Top 3 Recipes from Her Beloved NYC Hangout
20 Mouthwatering Recipes You Need to Try Today!
Sip, Swirl, and Celebrate: Toasting to National Wine Day on May 25th
National Drink Wine Day on February 18
Indulge in the Delightful Flavor of Oyster Soup on Its Special Day!

These Super Recipes for Your Football Party!

The Secrets Behind 3 Classic Comfort Food Recipes

Recipes to Spice Up Your February Menu

Top 20+ Must-Try Recipes Dominating February 2024