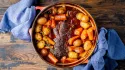
Strawberry Shortcut Cake
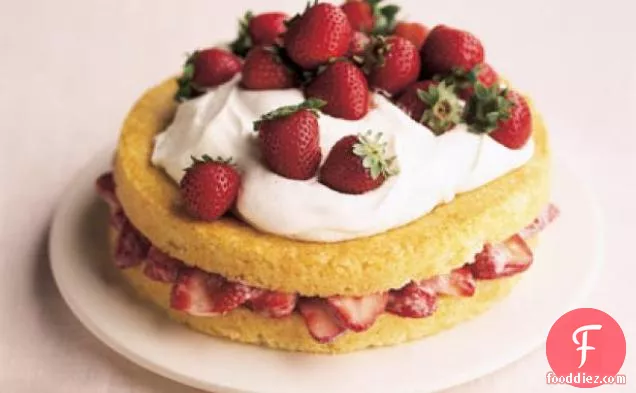
You can never have too many dessert recipes, so give Strawberry Shortcut Cake a try. Watching your figure? This vegetarian recipe has 350 calories, 4g of protein, and 18g of fat per serving. This recipe serves 8. It will be a hit at your Mother's Day event. A mixture of flour, heavy cream, egg, and a handful of other ingredients are all it takes to make this recipe so scrumptious. From preparation to the plate, this recipe takes approximately 55 minutes.
Instructions
1
For the cake: Preheat the oven to 375 degrees F. Butter an 8-inch round cake pan, line it with parchment paper, butter the paper, and dust the pan lightly with flour.
Ingredients you will need![Butter]() Butter
Butter![All Purpose Flour]() All Purpose Flour
All Purpose Flour
Equipment you will use![Baking Paper]() Baking Paper
Baking Paper![Cake Form]() Cake Form
Cake Form![Oven]() Oven
Oven
2
Whisk the flour with the granulated sugar, baking powder, and salt in a medium bowl. Lightly whisk in the butter, egg, milk, and vanilla, just until smooth.
Ingredients you will need![Granulated Sugar]() Granulated Sugar
Granulated Sugar![Baking Powder]() Baking Powder
Baking Powder![Vanilla]() Vanilla
Vanilla![Butter]() Butter
Butter![All Purpose Flour]() All Purpose Flour
All Purpose Flour![Milk]() Milk
Milk![Salt]() Salt
Salt![Egg]() Egg
Egg
Equipment you will use![Whisk]() Whisk
Whisk![Bowl]() Bowl
Bowl
3
Pour the batter into the prepared cake pan and bake until a toothpick inserted in the center comes out clean, about 25 minutes. Cool on a rack for 10 minutes, then turn it out of the pan, flip upright, and cool completely on the rack.
Equipment you will use![Toothpicks]() Toothpicks
Toothpicks![Oven]() Oven
Oven![Cake Form]() Cake Form
Cake Form
4
For the strawberries and cream: Set aside 1 pint of the best-looking whole berries for topping the cake. Hull and thinly slice the rest of the berries and toss with the granulated sugar. Set aside. Whip the cream with the confectioners' sugar and vanilla to soft peaks. Refrigerate until ready to use.
Ingredients you will need![Powdered Sugar]() Powdered Sugar
Powdered Sugar![Granulated Sugar]() Granulated Sugar
Granulated Sugar![Strawberries]() Strawberries
Strawberries![Berries]() Berries
Berries![Vanilla]() Vanilla
Vanilla![Cream]() Cream
Cream
1
Cutting a cake into layers is easy as saw-spin-separate: Begin to saw the cake in half horizontally. Just before you reach the middle of the cake, give it a quarter turn. Continue to saw almost to the center, then give it another quarter turn and saw again until you reach your original point of entry. Saw completely through the cake's center and separate the layers.


Ingredients
1teaspoon![baking powder]() baking powder1Tbsp
baking powder1Tbsp![confectioners' sugar]() confectioners' sugar1large
confectioners' sugar1large![egg, beaten]() egg, beaten237milliliters
egg, beaten237milliliters![all-purpose flour]() all-purpose flour177milliliters
all-purpose flour177milliliters![granulated sugar]() granulated sugar1Tbsp
granulated sugar1Tbsp![granulated sugar]() granulated sugar237milliliters
granulated sugar237milliliters![heavy cream]() heavy cream1teaspoons
heavy cream1teaspoons![fine salt]() fine salt2pints
fine salt2pints![strawberries]() strawberries4Tbsps
strawberries4Tbsps![unsalted butter, melted]() unsalted butter, melted1teaspoons
unsalted butter, melted1teaspoons![pure vanilla extract]() pure vanilla extract1teaspoon
pure vanilla extract1teaspoon![pure vanilla extract]() pure vanilla extract118milliliters
pure vanilla extract118milliliters![whole milk]() whole milk
whole milk
 baking powder1Tbsp
 confectioners' sugar1large
 egg, beaten237milliliters
 all-purpose flour177milliliters
 granulated sugar1Tbspgranulated sugar237milliliters
 heavy cream1teaspoons
 fine salt2pints
 strawberries4Tbsps
 unsalted butter, melted1teaspoons
 pure vanilla extract1teaspoonpure vanilla extract118milliliters
 whole milk
DifficultyHard
Ready In55 m.
Servings8
Health Score4
DietsLacto Ovo Vegetarian
Dish TypesSide Dish
Related recipes
Strawberry Satin Pie
Strawberry Rhubarb Jam
Cherry Rhubarb Jam
Nutty Fresh Strawberry Salad
Magazine

Your Inner Chef with Taylor Swift's Top 3 Recipes from Her Beloved NYC Hangout

20 Mouthwatering Recipes You Need to Try Today!

Master the Art of Making Perfect Pancakes with This Foolproof Recipe

The Science Behind Red Wine: Its Surprising Health Benefits and Potential Risks

12 Wine Cocktails for a Sophisticated Twist

Sip, Swirl, and Celebrate: Toasting to National Wine Day on May 25th

National Drink Wine Day on February 18

Celebrating Souffle Day with Delectable Delights

Indulge in the Delightful Flavor of Oyster Soup on Its Special Day!

Celebrating World Nutella Day

Chicken Recipes Collection – Ideas for Every Taste
Quick Recipes Collection – Tasty Food in a Hurry

Top 10 Christmas Cookies Recipes

Cosy Winter Breakfast Ideas

Hangover Remedies – Recipes to Recover With

Cooking Tips From Our Mothers

How to Cook Chicken Noodle Soup

How to Bake Cookies

How to Cook a Turkey

Quick Vegetarian Recipes
Your Inner Chef with Taylor Swift's Top 3 Recipes from Her Beloved NYC Hangout
20 Mouthwatering Recipes You Need to Try Today!
12 Wine Cocktails for a Sophisticated Twist
Celebrating Souffle Day with Delectable Delights
Indulge in the Delightful Flavor of Oyster Soup on Its Special Day!

These Super Recipes for Your Football Party!
The Secrets Behind 3 Classic Comfort Food Recipes

Celebrate National Pizza Day on February 9th with Mouthwatering Slices and Fun Facts

Vegetarian soup recipes are not just for vegetarians anymore