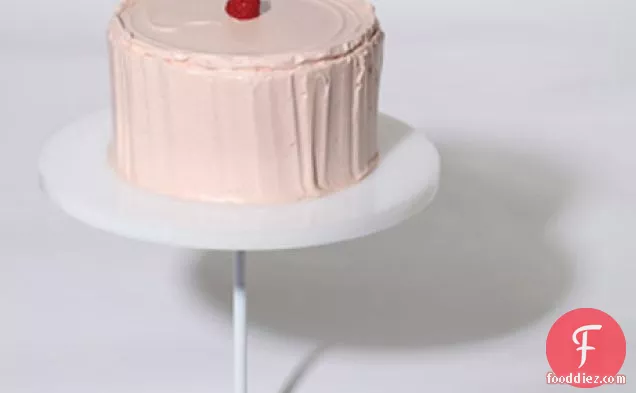
Thiebaud Pink Cake
Need a gluten free, dairy free, and fodmap friendly dessert? Thiebaud Pink Cake could be a super recipe to try. This recipe makes 6 servings with 145 calories, 1g of protein, and 3g of fat each. This recipe covers 2% of your daily requirements of vitamins and minerals. From preparation to the plate, this recipe takes roughly 45 minutes. Head to the store and pick up strawberries, water, simple syrup, and a few other things to make it today.
Instructions
1
To make the strawberry concentrate, wash, dry, and hull the strawberries.
Ingredients you will need![Strawberries]() Strawberries
Strawberries
2
Cut the berries in half or quarter them if they are especially big.
Ingredients you will need![Berries]() Berries
Berries
3
Combine the strawberries, water, and sugar in a medium nonreactive saucepan and bring the mixture to a simmer over medium-low heat, stirring to help the sugar dissolve. Turn down the heat to the low, cover, and simmer until the berries are soft, 8 to 10 minutes.
Ingredients you will need![Strawberries]() Strawberries
Strawberries![Berries]() Berries
Berries![Sugar]() Sugar
Sugar![Water]() Water
Water
Equipment you will use![Sauce Pan]() Sauce Pan
Sauce Pan
4
Remove from the heat and let the berries rest, covered, for 5 minutes.
Ingredients you will need![Berries]() Berries
Berries
5
Transfer the berry mixture to a fine-mesh sieve set over a medium nonreactive saucepan. Once all of the juice has drained, set the berries aside to use in another project. Bring the juice to a simmer over medium-low heat until it has reduced down to 1/4 cup (2.1 oz / 60 g), about 10 minutes, and set aside to cool.
Ingredients you will need![Berries]() Berries
Berries![Juice]() Juice
Juice
Equipment you will use![Sauce Pan]() Sauce Pan
Sauce Pan![Sieve]() Sieve
Sieve
6
To assemble the pink cake, place the cooled cake on a flat, stable work surface. Using a long, serrated knife, slice off the rounded top of the cake so that it is perfectly level. An even, flat top is key to the look of this dessert.
Equipment you will use![Serrated Knife]() Serrated Knife
Serrated Knife
7
Using the serrated knife, split the cake horizontally into 2 even layers. Split each half in half again so that you have a total of 4 layers.
Equipment you will use![Serrated Knife]() Serrated Knife
Serrated Knife
8
Place the bottom layer on an 8-inch cardboard cake round or directly on the serving platter and set on top of a cake turntable, if you have one. Generously brush the surface of the cake with simple syrup.
Ingredients you will need![Simple Syrup]() Simple Syrup
Simple Syrup
9
Prepare the buttercream by warming and whipping it to achieve a mayonnaise-like consistency (see Working with Buttercream). Measure out 1/2 cup (2.6 oz / 73 g) of buttercream and, using an offset spatula, spread it evenly on the bottom cake layer, being careful not to let it blop over the sides. As you spread the buttercream, let a small wall (about 1/4 inch high) form around the outer edge, creating a well for the lemon curd.
Ingredients you will need![Lemon Curd]() Lemon Curd
Lemon Curd![Mayonnaise]() Mayonnaise
Mayonnaise![Spread]() Spread
Spread
Equipment you will use![Offset Spatula]() Offset Spatula
Offset Spatula
10
Evenly distribute 1/4 cup (2.1 oz / 60 g) of the lemon curd in the well. Set another cake layer on top and brush with simple syrup; spread with buttercream, creating a well, and fill with lemon curd just as you did with the first layer. Repeat with the third layer. Top with the final cake layer.
Ingredients you will need![Simple Syrup]() Simple Syrup
Simple Syrup![Lemon Curd]() Lemon Curd
Lemon Curd![Spread]() Spread
Spread
11
If necessary, warm the buttercream once again. Measure out 1 cup (5.2 oz / 146 g) of buttercream and use the offset spatula to apply it as a crumb coat, a thin coating covering all surfaces of the cake; a crumb coat will seal the exterior of the cake to help prevent crumbs from marring the final frosting. (It's important to measure out buttercream specifically for the crumb coat so that the unused buttercream remains crumb free.) Refrigerate the cake for 10 to 15 minutes to set the crumb coat.
Ingredients you will need![Frosting]() Frosting
Frosting
Equipment you will use![Offset Spatula]() Offset Spatula
Offset Spatula
12
Reserve about 1/2 cup (2.6 oz / 73 g) of buttercream for the top of the cake. Using an offset spatula, apply a thick layer of the remaining buttercream to the sides of the chilled crumb-coated cake. At this point, it's not important that the cake look pretty—it's most important that the buttercream be evenly distributed around the sides. With the cake sitting squarely in the middle of the turntable and with the offset spatula held vertically against the frosting, begin spinning the turntable. Keep the cake moving steadily in one direction and apply light pressure with the spatula; the buttercream will begin to even out. I like to imagine the spatula as the needle that stays steady while the record (or cake) spins round and round on the turntable. My goal is to make the sides perfect before adding any Thiebaud personality. Make sure to watch the vertical line of the cake; I find it helpful to look at the right side of the cake at eye level while spinning the turntable. You can add more buttercream to any spots that seem thin and whittle down any thick spots with the spatula.
Ingredients you will need![Frosting]() Frosting
Frosting
Equipment you will use![Offset Spatula]() Offset Spatula
Offset Spatula![Spatula]() Spatula
Spatula
13
Once the sides are perfectly vertical and smooth, create as much or as little texture as you want in the buttercream. I constantly refer back to Display Cakes as I try to capture the casual, slightly imperfect look of Thiebaud's cakes onto my neatly frosted sides. It's not easy! While spinning the cake on the turntable, I often hold my offset spatula vertically and gently wobble it back and forth, or I take a quick swipe at the cake with the spatula blade as the turntable spins.
Equipment you will use![Offset Spatula]() Offset Spatula
Offset Spatula![Spatula]() Spatula
Spatula
14
When the sides are to your liking, you'll find a ring of buttercream standing up above the surface of the cake. Lightly "grab" the excess buttercream in one area with the offset spatula and pull it toward the center of the cake, spreading it toward the center. Repeat until you have a nice, clean edge all around.
Equipment you will use![Offset Spatula]() Offset Spatula
Offset Spatula
15
If necessary, warm the reserved buttercream, and then mound it up on top of the cake in the center. Using a small offset spatula, start from the center and begin smoothing out the buttercream, inching it closer and closer to the edge of the cake. I work fairly slowly when doing this in order to get a nice, voluminous lip of buttercream where the sides and the top of the cake meet, re-creating the ring that appears around the top edge of Thiebaud's pink cake.
Equipment you will use![Offset Spatula]() Offset Spatula
Offset Spatula
18
Do Ahead: This cake has many different components that require preparation before the cake can be assembled. The cake needs to be baked and thoroughly chilled before assembly, so consider making it the day before. It will keep for up to 5 days in the refrigerator or for up 2 months in the freezer. The lemon curd takes 3 to 4 hours to set, so consider preparing it while the cake is baking. It can be kept for up to 1 week in the refrigerator or for 4 months in the freezer. The strawberry concentrate can be made ahead and stored for up to 1 week in an airtight container in the refrigerator or 4 months in the freezer, but should be at room temperature before using. The buttercream is easiest to use when it's freshly made, but it can also be made ahead and easily rewarmed before frosting the cake (see Working with Buttercream). It will keep for up to 1 week in the refrigerator or for up to 4 months in the freezer. The simple syrup can be made shortly before assembling the cake but, if made ahead of time, will keep for up to 3 weeks in the refrigerator. To store leftover cake, press plastic wrap against the cut sides and refrigerate for up to 1 week. Bring to room temperature before serving.Above and Beyond: In the painting Display Cakes, the pink cake is the smallest of the three. But since 6-inch cake pans aren't common in home kitchens, I've made this cake the same size as the other two. To make a more faithful replica of the painting, bake the cake batter in two 6 by 2-inch cake pans; see Variations in Rose's Downy Yellow Butter Cake for details. Split each baked cake into 2 even layers so that you have a total of 4 layers. Build the cake on a 6-inch cardboard cake round or directly on a serving platter, using slightly less simple syrup, buttercream, and lemon curd on each layer.
Ingredients you will need![Simple Syrup]() Simple Syrup
Simple Syrup![Lemon Curd]() Lemon Curd
Lemon Curd![Strawberries]() Strawberries
Strawberries![Frosting]() Frosting
Frosting![Butter]() Butter
Butter![Cream]() Cream
Cream![Wrap]() Wrap
Wrap
Equipment you will use![Plastic Wrap]() Plastic Wrap
Plastic Wrap![Oven]() Oven
Oven


DifficultyHard
Ready In45 m.
Servings6
Health Score0
Dish TypesSide Dish
Related recipes
Fried Quinces, in the Manner of the Countess
Apricot-Apple Cranberry Sauce
Glazed Spiced Apples
Easy Apple Cole Slaw
Magazine

Your Inner Chef with Taylor Swift's Top 3 Recipes from Her Beloved NYC Hangout

20 Mouthwatering Recipes You Need to Try Today!

Master the Art of Making Perfect Pancakes with This Foolproof Recipe

The Science Behind Red Wine: Its Surprising Health Benefits and Potential Risks

12 Wine Cocktails for a Sophisticated Twist

Sip, Swirl, and Celebrate: Toasting to National Wine Day on May 25th

National Drink Wine Day on February 18

Celebrating Souffle Day with Delectable Delights

Indulge in the Delightful Flavor of Oyster Soup on Its Special Day!

Celebrating World Nutella Day
How to Make Lasagne

How to Eat Grapefruit to Lose Weight
How to Cut Kiwi
How to Make Porridge with Water

How to Make Porridge with Coconut Milk
How to Make Porridge in the Microwave

How to Make Pancakes

How to Make a Romantic Dinner
How to Create a Classic Valentine's Day Menu

What Should I Cook in February?
Your Inner Chef with Taylor Swift's Top 3 Recipes from Her Beloved NYC Hangout
12 Wine Cocktails for a Sophisticated Twist
Celebrating Souffle Day with Delectable Delights
Indulge in the Delightful Flavor of Oyster Soup on Its Special Day!

These Super Recipes for Your Football Party!
The Secrets Behind 3 Classic Comfort Food Recipes
10 Warming Recipes to Beat the Cold Days

A Collection of 15 Noodle Soup Recipes to Warm Your Soul

The Rich and Flavorful Black Food Traditions in Netflix's 'High on the Hog'