Melty American-style Cheddar Cheese Slices For Burgers and Grilled Cheese
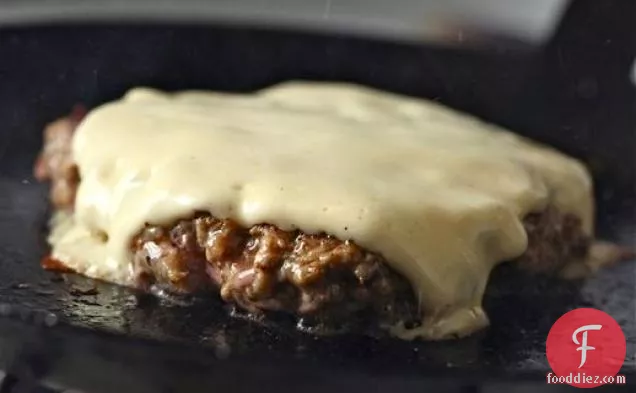
Melty American-style Cheddar Cheese Slices This recipe covers 17% of your daily requirements of vitamins and minerals. If you have evaporated milk, powdered gelatin, sharp cheddar cheese, and From preparation to the plate, this recipe takes approximately 10 minutes. It works well as a main course.
Instructions
1
Line two flat rimmed baking sheets or large square or rectangular platters with a layer of plastic cling wrap and set aside. In a small bowl or cup, sprinkle the gelatin over the water and allow it to hydrate, about 1 minute. Meanwhile, heat the evaporated milk in a small saucepan over medium high heat, stirring constantly with a rubber spatula to prevent burning on the bottom of the pan. When milk comes to a simmer, add hydrated gelatin and stir until melted.
Ingredients you will need![Evaporated Milk]() Evaporated Milk
Evaporated Milk![Gelatin]() Gelatin
Gelatin![Water]() Water
Water![Milk]() Milk
Milk![Wrap]() Wrap
Wrap
Equipment you will use![Baking Sheet]() Baking Sheet
Baking Sheet![Sauce Pan]() Sauce Pan
Sauce Pan![Spatula]() Spatula
Spatula![Bowl]() Bowl
Bowl![Frying Pan]() Frying Pan
Frying Pan
3
Add cheese all at once and stir with a whisk to combine. Return pan to low heat and continue to whisk until mixture is homogenous and registers between 160 and 170°F on an instant read thermometer. Beat with the blade of an immersion blender directly in the pot until glossy and smoother. Alternatively, transfer to the bowl of a blender or food processor and blend, starting at the lowest speed and slowly increasing to the highest. Blend for 30 seconds, stopping to scrape down sides as necessary. If necessary, blend in two separate batches, pouring first half onto lined sheet tray before proceeding to second half (see step 3).
Ingredients you will need![Cheese]() Cheese
Cheese
Equipment you will use![Immersion Blender]() Immersion Blender
Immersion Blender![Food Processor]() Food Processor
Food Processor![Kitchen Thermometer]() Kitchen Thermometer
Kitchen Thermometer![Blender]() Blender
Blender![Whisk]() Whisk
Whisk![Bowl]() Bowl
Bowl![Frying Pan]() Frying Pan
Frying Pan![Pot]() Pot
Pot
4
Pour mixture out of the blender and onto the prepared baking sheets. You should end up with a layer a few millimeters thick on each tray. Use a rubber spatula to distribute the cheese in an even layer.
Ingredients you will need![Cheese]() Cheese
Cheese
Equipment you will use![Baking Sheet]() Baking Sheet
Baking Sheet![Blender]() Blender
Blender![Spatula]() Spatula
Spatula
5
Transfer to a flat place in the refrigerator and allow to cool until firm to the touch, at least ten minutes (you may need longer depending on how cold your fridge it, how thick your plates or trays are, and how well your fridge circulates air).
6
When cheese has cooled, carefully lift the plastic wrap and transfer the whole thing to a cutting board.
Ingredients you will need![Cheese]() Cheese
Cheese![Wrap]() Wrap
Wrap
Equipment you will use![Cutting Board]() Cutting Board
Cutting Board![Plastic Wrap]() Plastic Wrap
Plastic Wrap
7
Cut the cheese into square slices, cutting all the way through the plastic. Carefully left each slice with the plastic still attached and stack, leaving the plastic in between each layer. Repeat with the other sheet tray. Store cheese slices in a sealed container in the fridge for up to 3 weeks.
Ingredients you will need![Cheese]() Cheese
Cheese
Equipment


DifficultyNormal
Ready In10 m.
Servings3
Health Score12
Related recipes
Roasted Corn and Avocado Dip
Gingered Orange Carrots
Baked Southern Grits
Broccoli Cheese Twice-Baked Potatoes
Magazine

Your Inner Chef with Taylor Swift's Top 3 Recipes from Her Beloved NYC Hangout

20 Mouthwatering Recipes You Need to Try Today!

Master the Art of Making Perfect Pancakes with This Foolproof Recipe

The Science Behind Red Wine: Its Surprising Health Benefits and Potential Risks

12 Wine Cocktails for a Sophisticated Twist

Sip, Swirl, and Celebrate: Toasting to National Wine Day on May 25th

National Drink Wine Day on February 18

Celebrating Souffle Day with Delectable Delights

Indulge in the Delightful Flavor of Oyster Soup on Its Special Day!

Celebrating World Nutella Day

Celebrate Spring with 3 Fresh Dishes
10 Healthy Springtime foods and How to Prepare Them

5 Simple Guidelines to Demystify 'Seasonal Cooking'

How to Grill Vegetables
How to Make Overnight Oats

How to Make Quiche

22 Dinner Ideas for Warm Summer Nights

23 Healthy Summer Recipes

30 Light Recipe Ideas for Hot Summer Days

Hydrating Foods for Your Summer Diet
Your Inner Chef with Taylor Swift's Top 3 Recipes from Her Beloved NYC Hangout
Master the Art of Making Perfect Pancakes with This Foolproof Recipe
The Science Behind Red Wine: Its Surprising Health Benefits and Potential Risks
12 Wine Cocktails for a Sophisticated Twist
Sip, Swirl, and Celebrate: Toasting to National Wine Day on May 25th
National Drink Wine Day on February 18
Indulge in the Delightful Flavor of Oyster Soup on Its Special Day!

Food Pyramids from Different Cultures

10 Delicious and Refreshing Cocktail Recipes for January!