Limited Edition Holiday Fauxreos
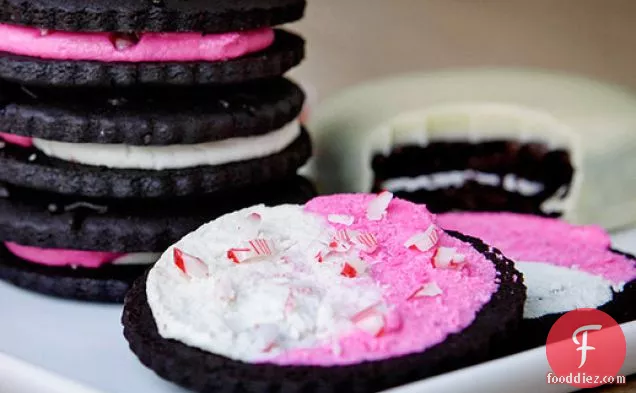
Limited Edition Holiday Fauxreos might be just the hor d'oeuvre you are searching for. This recipe covers 3% of your daily requirements of vitamins and minerals. This recipe makes 32 servings with 215 calories, 2g of protein, and 13g of fat each. If you have cream, salt, candy canes, and a few other ingredients on hand, you can make it. From preparation to the plate, this recipe takes around 2 hours.
Instructions
1
To make the cookies: Using a hand or stand mixer set to medium speed, cream together butter, both sugars, salt baking powder, baking soda, vanilla extract and peppermint oil until combined. With mixer still running, add in egg yolks one at a time. Once incorporated, shut off mixer and scrape bowl down with a rubber spatula.
Ingredients you will need![Peppermint Oil]() Peppermint Oil
Peppermint Oil![Baking Soda]() Baking Soda
Baking Soda![Egg Yolk]() Egg Yolk
Egg Yolk![Cookies]() Cookies
Cookies![Butter]() Butter
Butter![Cream]() Cream
Cream![Salt]() Salt
Salt
Equipment you will use![Stand Mixer]() Stand Mixer
Stand Mixer![Spatula]() Spatula
Spatula![Bowl]() Bowl
Bowl
2
Turn mixer to its lowest setting. Dump in flour and cocoa all at once. The mixture will be stiff. Continue mixing until uniform. Shut off mixer. Use a spatula to scrape the dough from the bowl and knead lightly to form a smooth ball. Use your hands to flatten into a disc.You may begin rolling the dough right away, or you may wrap it with plastic and refrigerate for up to a week.If you've kept the dough refrigerated, let it sit at room temperature to soften before starting to roll.
Ingredients you will need![Cocoa Powder]() Cocoa Powder
Cocoa Powder![Dough]() Dough
Dough![All Purpose Flour]() All Purpose Flour
All Purpose Flour![Roll]() Roll
Roll![Wrap]() Wrap
Wrap
Equipment you will use![Spatula]() Spatula
Spatula![Blender]() Blender
Blender![Bowl]() Bowl
Bowl
3
Preheat oven to 350° F. Sift some cocoa powder onto the counter (using cocoa instead of flour gives the Fauxreos their uniquely dark color). Use a rolling pin to roll the dough to 1/8" thickness (as thick as 3 dimes, stacked).When finished, slide a metal spatula between the dough and counter to loosen. This will prevent the cookies from sticking.A 2" round cutter makes perfect "Oreos" but use any cutter you like.
Ingredients you will need![Cocoa Powder]() Cocoa Powder
Cocoa Powder![Cookies]() Cookies
Cookies![Dough]() Dough
Dough![All Purpose Flour]() All Purpose Flour
All Purpose Flour![Oreo Cookies]() Oreo Cookies
Oreo Cookies![Roll]() Roll
Roll
Equipment you will use![Rolling Pin]() Rolling Pin
Rolling Pin![Spatula]() Spatula
Spatula![Oven]() Oven
Oven
4
Cut out the cookies and use a metal spatula to lift and transfer to cookie sheet.Arrange cookies on ungreased cookie sheet. (If the cookie sheet is dinged up or uneven, line with parchment paper first.) The cookies will not spread during baking, so they may be arranged quite close together. Set the sheets aside.
Ingredients you will need![Cookies]() Cookies
Cookies![Spread]() Spread
Spread
Equipment you will use![Baking Paper]() Baking Paper
Baking Paper![Baking Sheet]() Baking Sheet
Baking Sheet![Spatula]() Spatula
Spatula
5
Gather up, knead, and re-roll the remaining dough scraps, likewise cutting and arranging on a cookie sheet.To pipe a design on the cookies, place any remaining dough in a mixing bowl.
Ingredients you will need![Cookies]() Cookies
Cookies![Dough]() Dough
Dough![Roll]() Roll
Roll
Equipment you will use![Baking Sheet]() Baking Sheet
Baking Sheet![Mixing Bowl]() Mixing Bowl
Mixing Bowl
6
Mix with a hand or stand mixer and add about 1 tsp of hot water. Continue adding hot water, a teaspoon at a time, until the dough has thinned into a paste. You can always add more liquid, but you can't take it away.
Ingredients you will need![Dough]() Dough
Dough![Water]() Water
Water
Equipment you will use![Stand Mixer]() Stand Mixer
Stand Mixer
7
Add slowly and let each addition mix in fully before adding more. When the mixture reaches a frosting-like consistency, use a spatula to scrape it out.
Ingredients you will need![Frosting]() Frosting
Frosting
Equipment you will use![Spatula]() Spatula
Spatula
8
Transfer to a piping bag fitted with a very small tip, or a heavy duty Ziploc bag with a tiny hole poked in the corner.Holiday Oreos have winter-themed designs atop them, like snowflakes and ice skates.
Ingredients you will need![Oreo Cookies]() Oreo Cookies
Oreo Cookies![Ice]() Ice
Ice
9
Once the cookies have been decorated, bake for about 12 minutes, or until quite firm to the touch. If your oven has an uneven heating element, rotate the cookie sheets after six minutes. Once the cookies have baked, cool thoroughly, directly on the cooling rack.
Ingredients you will need![Cookies]() Cookies
Cookies
Equipment you will use![Baking Sheet]() Baking Sheet
Baking Sheet![Wire Rack]() Wire Rack
Wire Rack![Oven]() Oven
Oven
10
To make the filling: With a hand or stand mixer, cream together shortening/butter, powdered sugar, vanilla and salt. Cream on medium speed for five minutes; use a rubber spatula to scrape the bowl down periodically. The long mixing time aerates the filling, making it especially white and less gritty.Using a spatula, transfer half the filling to a small pastry bag fitted with a plain tip. Alternately you can use a Ziploc bag with the corner snipped off as a makeshift pastry bag.
Ingredients you will need![Powdered Sugar]() Powdered Sugar
Powdered Sugar![Shortening]() Shortening
Shortening![Vanilla]() Vanilla
Vanilla![Butter]() Butter
Butter![Cream]() Cream
Cream![Salt]() Salt
Salt
Equipment you will use![Stand Mixer]() Stand Mixer
Stand Mixer![Pastry Bag]() Pastry Bag
Pastry Bag![Spatula]() Spatula
Spatula![Bowl]() Bowl
Bowl
11
Add the peppermint oil and the food coloring to the remaining mixture and beat until evenly colored (or don't! It looks really nice kinda swirled and uneven). Likewise transfer this mixture to a piping bag.
Ingredients you will need![Peppermint Oil]() Peppermint Oil
Peppermint Oil![Food Color]() Food Color
Food Color
12
To assemble the cookies: Flip half the wafers upside down. Onto each, pipe a swirl of vanilla filling, like you're making a yin-yang symbol. After, pipe on the other half with the peppermint. To finish, sprinkle each cookie generously with crushed candy cane bits, then top with remaining wafers. Press down with your fingers, applying very even pressure so the filling will spread uniformly across the cookie.
Ingredients you will need![Candy Cane]() Candy Cane
Candy Cane![Peppermint]() Peppermint
Peppermint![Wafer Cookies]() Wafer Cookies
Wafer Cookies![Vanilla]() Vanilla
Vanilla![Spread]() Spread
Spread
13
Transfer cookies to an airtight container and refrigerate for several hours. This is crucial. After whipping the filling, it will be quite soft. Refrigerating it will solidify the filling, restoring its proper texture, and bonding it with the wafers. If you plan to dip the cookies, store them in the freezer until needed (dipping them while cold helps the ganache coat them in a thicker layer).
Ingredients you will need![Wafer Cookies]() Wafer Cookies
Wafer Cookies![Dip]() Dip
Dip
14
To make the white chocolate coating:In a small sauce pan, bring cream to a simmer. Shut off the heat and begin adding white chocolate a little at a time, while whisking. Continue whisking until white chocolate has melted completely. If the mixture becomes too thick or too cool and it seems the white chocolate has stopped melting, turn the heat to low and whisk until melted.
Ingredients you will need![Almond Bark]() Almond Bark
Almond Bark![White Chocolate]() White Chocolate
White Chocolate![Cream]() Cream
Cream![Sauce]() Sauce
Sauce
Equipment you will use![Whisk]() Whisk
Whisk![Sauce Pan]() Sauce Pan
Sauce Pan
16
Transfer this white chocolate mixture to the smallest bowl you have that will accommodate it. (This creates more depth, making dipping easier.)
Ingredients you will need![White Chocolate]() White Chocolate
White Chocolate
Equipment you will use![Bowl]() Bowl
Bowl
17
Let the white chocolate stand, stirring occasionally to prevent a skin from forming, until it is no longer hot. It should be about body temperature.
Ingredients you will need![White Chocolate]() White Chocolate
White Chocolate
18
Dip the cookies:Have a parchment lined sheet pan standing nearby.Drop one cookie into the center of the bowl. Use a fork to submerge it completely. Lift it from the ganache and tap the fork against the edge of the bowl quite firmly to encourage excess ganache to drip off. Drag the cookie bottom across the edge of the bowl to scrape off any excess from the bottom, and transfer to the parchment lined pan.Continue dipping all the cookies; if the ganache becomes too thick, microwave for just 10 seconds and stir with a fork to restore fluidity, then continue dipping.Refrigerate the cookies for about 20 minutes, until the ganache has set. Dip the cookies a second time, warming the bowl of ganache in the microwave as needed. Return the cookies to the fridge to set, and then? Dig in.Store the dipped cookies in the fridge for several days. Undipped cookies will last, refrigerated, about two weeks.
Ingredients you will need![Cookies]() Cookies
Cookies![Dip]() Dip
Dip
Equipment you will use![Microwave]() Microwave
Microwave![Bowl]() Bowl
Bowl![Frying Pan]() Frying Pan
Frying Pan
Equipment


Ingredients
113grams![all purpose flour (or rice flour), sifted]() all purpose flour (or rice flour), sifted0teaspoons
all purpose flour (or rice flour), sifted0teaspoons![baking soda]() baking soda43grams
baking soda43grams![brown sugar]() brown sugar4
brown sugar4![candy canes, crushed]() candy canes, crushed1teaspoons
candy canes, crushed1teaspoons![peppermint oil]() peppermint oil85grams
peppermint oil85grams![cocoa powder, sifted]() cocoa powder, sifted227grams
cocoa powder, sifted227grams![cream]() cream2
cream2![egg yolks]() egg yolks32servings
egg yolks32servings![optional: red or pink food coloring]() optional: red or pink food coloring142grams
optional: red or pink food coloring142grams![powdered sugar, sifted]() powdered sugar, sifted0teaspoons
powdered sugar, sifted0teaspoons![salt]() salt57grams
salt57grams![shortening or unsalted butter at room temperature]() shortening or unsalted butter at room temperature106grams
shortening or unsalted butter at room temperature106grams![sugar]() sugar85grams
sugar85grams![unsalted butter, room temperature]() unsalted butter, room temperature1teaspoon
unsalted butter, room temperature1teaspoon![vanilla extract]() vanilla extract539grams
vanilla extract539grams![white chocolate, chopped]() white chocolate, chopped0
white chocolate, chopped0![plus 1/8 teaspoons baking powder]() plus 1/8 teaspoons baking powder
plus 1/8 teaspoons baking powder
 all purpose flour (or rice flour), sifted0teaspoons
 baking soda43grams
 brown sugar4
 candy canes, crushed1teaspoons
 peppermint oil85grams
 cocoa powder, sifted227grams
 cream2
 egg yolks32servings
 optional: red or pink food coloring142grams
 powdered sugar, sifted0teaspoons
 salt57grams
 shortening or unsalted butter at room temperature106grams
 sugar85grams
 unsalted butter, room temperature1teaspoon
 vanilla extract539grams
 white chocolate, chopped0plus 1/8 teaspoons baking powder
DifficultyExpert
Ready In2 hrs
Servings32
Health Score0
Related recipes
Grain-free Apple Cinnamon Pancakes
Baked Apple Doughnuts
Spelt Russet Apple Slice
Apple Cider Doughnuts
Magazine

Your Inner Chef with Taylor Swift's Top 3 Recipes from Her Beloved NYC Hangout

20 Mouthwatering Recipes You Need to Try Today!

Master the Art of Making Perfect Pancakes with This Foolproof Recipe

The Science Behind Red Wine: Its Surprising Health Benefits and Potential Risks

12 Wine Cocktails for a Sophisticated Twist

Sip, Swirl, and Celebrate: Toasting to National Wine Day on May 25th

National Drink Wine Day on February 18

Celebrating Souffle Day with Delectable Delights

Indulge in the Delightful Flavor of Oyster Soup on Its Special Day!

Celebrating World Nutella Day

23 Spinach Recipes You'll Want to Eat Every Day

8 Watermelon Recipes You'll Crave
10 Ways to Use Leftover Eggplant

All You Need to Know about Traditional Vietnamese Food

Nine Traditional Korean Foods You Should Try

Getting to Know Traditional Spanish Cuisine
How to Cook Cabbage

How to Cook Cucumbers

How to Cook Eggplants

How to Cook Kale
Your Inner Chef with Taylor Swift's Top 3 Recipes from Her Beloved NYC Hangout

Celebrate National Pizza Day on February 9th with Mouthwatering Slices and Fun Facts

Indiana's Exciting Addition to the Summer Food Program for School Children

Readers' Top Picks for the Best Restaurant Desserts on National Dessert Day

Artichoke Tomato Pesto Flatbread Recipe A Scrumptious Twist on Savory Classics

Mastering Weeknight Meals with 30 Days of 25-Minute Dinner Recipes

Healthy and Delicious 5-Ingredient Breakfast Recipes

Top 10 Pioneer Woman Recipes of 2023!

From Ropa Vieja to Mojitos Traditional Cuban Cuisine