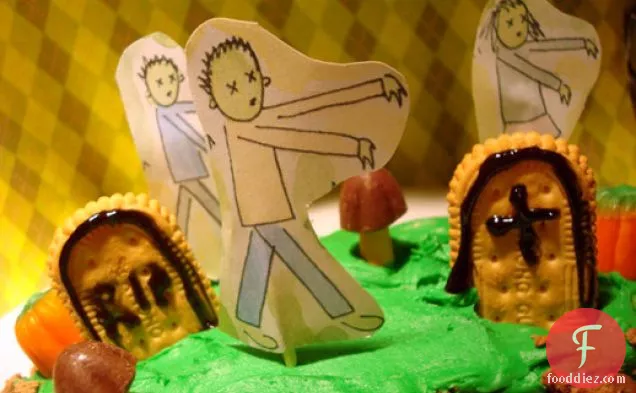
Zombie Graveyard Cake

You can never have too many dessert recipes, so give Zombie Graveyard Cake
Instructions
1
Prepare the frosting: Cream the butter in a mixing bowl fitted with the paddle attachment, mixing on medium speed until smooth and creamy in texture.
Ingredients you will need![Frosting]() Frosting
Frosting![Butter]() Butter
Butter![Cream]() Cream
Cream
Equipment you will use![Mixing Bowl]() Mixing Bowl
Mixing Bowl
2
Add 4 cups of the confectioners' sugar, half of the cream, and the vanilla extract. On medium speed, beat until smooth and creamy, 3 to 5 minutes.
Ingredients you will need![Powdered Sugar]() Powdered Sugar
Powdered Sugar![Vanilla Extract]() Vanilla Extract
Vanilla Extract![Cream]() Cream
Cream
3
Gradually add the remaining sugar, 1 cup at a time, beating well after each addition (about 2 minutes), until the icing is thick enough to be of good spreading consistency. You may find that you don't need all of the sugar. If desired, the remaining cream can be used to make the frosting easier to spread.
Ingredients you will need![Frosting]() Frosting
Frosting![Spread]() Spread
Spread![Cream]() Cream
Cream![Icing]() Icing
Icing![Sugar]() Sugar
Sugar
4
Add the food coloring in last, mixing until the coloring is even.
Ingredients you will need![Food Color]() Food Color
Food Color
5
Apply a small quantity of the frosting to the top and sides of the cake to be used as a crumb coat. Chill the cake for 20-30 minutes or until the crumb coat layer is firm.
Ingredients you will need![Frosting]() Frosting
Frosting
6
Apply the rest of the frosting to the cake, applying most generously to the top of the cake, but putting enough on the sides of the cake so that there is an opaque layer covering the cake.
Ingredients you will need![Frosting]() Frosting
Frosting
7
Immediately after frosting the cake, press the crumbled chocolate wafer cookies on the sides of the frosted cake. If you'd like, sprinkle a few crumbs on top, too.
Ingredients you will need![Chocolate Wafer Cookies]() Chocolate Wafer Cookies
Chocolate Wafer Cookies![Frosting]() Frosting
Frosting
8
Prepare your "graves". On the top half of a sandwich cookie (I used Vienna fingers for their oblong shape), write "RIP" or a spooky message.
Ingredients you will need![Cookies]() Cookies
Cookies
9
Let the writing icing set for a couple of minutes, and then press the cookie into the cake until half of it is submerged. It will resemble the shape of a grave in the cake. Repeat to form as many gravestones as you'd like.
Ingredients you will need![Writing Icing]() Writing Icing
Writing Icing![Cookies]() Cookies
Cookies
10
Create several zombie cake picks by cutting out these printable illustrations and taping them (on the back side) to toothpicks. Insert zombie picks into cake. Finish the cake by adding whatever other spooky garnishes you'd like (meringue skulls, candy mushrooms, et cetera).
Ingredients you will need![Mushrooms]() Mushrooms
Mushrooms![Candy]() Candy
Candy
Equipment you will use![Toothpicks]() Toothpicks
Toothpicks
Ingredients
237milliliters![butter (2 sticks)]() butter (2 sticks)473milliliters
butter (2 sticks)473milliliters![coarsely crumbled chocolate wafer cookies]() coarsely crumbled chocolate wafer cookies1liters
coarsely crumbled chocolate wafer cookies1liters![confectioners' sugar]() confectioners' sugar12servings
confectioners' sugar12servings![Rounded cookies such as Vienna Fingers, to use as]() Rounded cookies such as Vienna Fingers, to use as "graves59milliliters
Rounded cookies such as Vienna Fingers, to use as "graves59milliliters![cream (you may not use all of it)]() cream (you may not use all of it)1drop
cream (you may not use all of it)1drop![Several green food coloring]() Several green food coloring12servings
Several green food coloring12servings![Writing icing]() Writing icing1
Writing icing1![baked 9-inch square or circle cake, flavor]() baked 9-inch square or circle cake, flavor1teaspoon
baked 9-inch square or circle cake, flavor1teaspoon![vanilla extract]() vanilla extract
vanilla extract
 butter (2 sticks)473milliliters
 coarsely crumbled chocolate wafer cookies1liters
 confectioners' sugar12servings
 Rounded cookies such as Vienna Fingers, to use as "graves59milliliters
 cream (you may not use all of it)1drop
 Several green food coloring12servings
 Writing icing1
 baked 9-inch square or circle cake, flavor1teaspoon
 vanilla extract
DifficultyExpert
Ready In1 h
Servings12
Health Score1
Related recipes
Monster Cookies
Monster Caramel Apples
Black & White Spider Cookies
The Ultimate Caramel Apple Pie
Magazine

Your Inner Chef with Taylor Swift's Top 3 Recipes from Her Beloved NYC Hangout

20 Mouthwatering Recipes You Need to Try Today!

Master the Art of Making Perfect Pancakes with This Foolproof Recipe

The Science Behind Red Wine: Its Surprising Health Benefits and Potential Risks

12 Wine Cocktails for a Sophisticated Twist

Sip, Swirl, and Celebrate: Toasting to National Wine Day on May 25th

National Drink Wine Day on February 18

Celebrating Souffle Day with Delectable Delights

Indulge in the Delightful Flavor of Oyster Soup on Its Special Day!

Celebrating World Nutella Day

How to Cook Red Cabbage

How to Cook a Goose

How to Cook a Duck

How to Make an Easy Christmas Dinner

How to Prepare Christmas Food in Advance

Top 20 Food Ideas in January

The Best 10 Dinner Ideas for Tonight

The 10 Most Popular Dinners of All Time!

20 Best Lunch Ideas to Recover From the Cold

21 Stress-Busting Recipes to Boost Your Mood Tonight

Your Inner Chef with Taylor Swift's Top 3 Recipes from Her Beloved NYC Hangout

12 Wine Cocktails for a Sophisticated Twist

Celebrating Souffle Day with Delectable Delights

Indulge in the Delightful Flavor of Oyster Soup on Its Special Day!

These Super Recipes for Your Football Party!

The Secrets Behind 3 Classic Comfort Food Recipes

10 Warming Recipes to Beat the Cold Days

A Collection of 15 Noodle Soup Recipes to Warm Your Soul

The Rich and Flavorful Black Food Traditions in Netflix's 'High on the Hog'


