Vanilla Ice Cream Sandwiches
Vanillan Ice Cream Sandwiches is a gluten free and fodmap friendly dessert. This recipe makes 12 servings with 569 calories, 10g of protein, and 32g of fat each. This recipe covers 12% of your daily requirements of vitamins and minerals. Head to the store and pick up coffee, instant espresso powder, sugar, and a few other things to make it today. From preparation to the plate, this recipe takes roughly 24 hours. It can be enjoyed any time, but it is especially good for Summer.
Instructions
1
Make the chocolate wafers: Preheat oven to 350° and line 2 sheet pans with parchment paper. With a hand or stand mixer, cream together butter, sugars, salt, baking soda, powder, espresso, and vanilla on medium speed.
Ingredients you will need![Chocolate Wafer Cookies]() Chocolate Wafer Cookies
Chocolate Wafer Cookies![Baking Soda]() Baking Soda
Baking Soda![Espresso]() Espresso
Espresso![Vanilla]() Vanilla
Vanilla![Butter]() Butter
Butter![Cream]() Cream
Cream![Salt]() Salt
Salt
Equipment you will use![Baking Paper]() Baking Paper
Baking Paper![Stand Mixer]() Stand Mixer
Stand Mixer![Oven]() Oven
Oven
2
Mix for about two minutes, just until combined. Then (with the machine still running) add in the yolks, one at a time. During this process, shut off the mixer and scrape the bowl down with a rubber spatula once or twice. Reduce mixing speed to low and dump in the flour and cocoa all at once.
Ingredients you will need![Cocoa Powder]() Cocoa Powder
Cocoa Powder![All Purpose Flour]() All Purpose Flour
All Purpose Flour![Egg Yolk]() Egg Yolk
Egg Yolk
Equipment you will use![Spatula]() Spatula
Spatula![Blender]() Blender
Blender![Bowl]() Bowl
Bowl
3
Mix until the dry ingredients have fully incorporated.With the mixer still running on low, drizzle in the hot coffee a little at a time. About halfway through, stop the mixer and scrape the bowl down. Continue drizzling in the coffee to transform the dough into a paste.In the end, it should have a smooth cake-batter like consistency. If you notice any lumps, crank up the mixer speed to medium and beat until the lumps have disappeared. If a few remain, don't worry; they'll bake out.Divide the batter evenly between the two sheet pans (roughly 15 ounces each). Use an offset spatula or the back of a spoon to spread the batter into a thin layer; you don't need the batter to reach to the very corners, it only needs to cover a 10" by 14" area. Rap the sheet pans against the counter to help level the batter.
Ingredients you will need![Coffee]() Coffee
Coffee![Spread]() Spread
Spread![Dough]() Dough
Dough
Equipment you will use![Offset Spatula]() Offset Spatula
Offset Spatula![Oven]() Oven
Oven![Blender]() Blender
Blender![Bowl]() Bowl
Bowl
4
Bake for about 7-10 minutes, or until the cookie-sheets have puffed up and become firm to the touch. Cool thoroughly.For greatest ease of handling, refrigerate or freeze the wafers before proceeding. If you're quite careful, it's not necessary, but it does make the process easier.
Ingredients you will need![Wafer Cookies]() Wafer Cookies
Wafer Cookies
Equipment you will use![Oven]() Oven
Oven
5
Prepare the wafers: Line a 9" x 13" brownie pan with parchment paper. The paper should overhang the long sides by 4 inches or so. Use a knife to cut the two cooled chocolate wafers into 9 x 13" rectangles. Set aside the excess scraps. Fit one of these giant wafers, shiny side down, into the bottom of the parchment lined brownie pan. Once you've fitted it in, peel off the parchment paper stuck to the bottom. If the wafer cracks or breaks in any place, use some of the trimmings to patch up the hole. The wafers will meld together nicely just by pressing two pieces together firmly. Store the pan and remaining chocolate wafer in the freezer until needed.
Ingredients you will need![Chocolate Wafer Cookies]() Chocolate Wafer Cookies
Chocolate Wafer Cookies![Chocolate]() Chocolate
Chocolate![Wafer]() Wafer
Wafer
Equipment you will use![Baking Paper]() Baking Paper
Baking Paper![Knife]() Knife
Knife![Frying Pan]() Frying Pan
Frying Pan
6
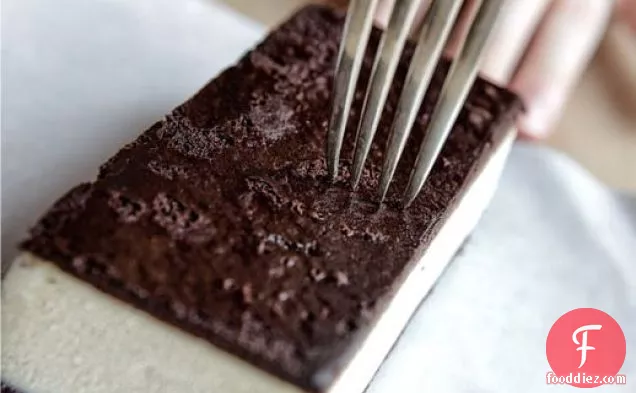
Fill the ice cream sandwich: If you're opting for homemade ice cream, you will want to use it immediately after it's finished churning in your ice cream maker. If you're using store bought, store it in the refrigerator for 30 minutes or until it has become soft and spreadable.In either case, spread the ice cream into the brownie pan, atop the first chocolate layer. Use a spoon or offset spatula to push the ice cream up into the corners of the pan, and to distribute it evenly. Invert the remaining frozen chocolate wafer onto a cutting board. Peel of the parchment paper and then place it shiny side up on top of the ice cream.Cover the wafer with a piece of parchment or plastic wrap, then use your hands to gently press the top wafer down and seal it against the ice cream. If you notice there are any thin or uneven places, gently push on the chocolate wafer to redistribute the ice cream below.Return the pan to the freezer and allow it to freeze for at least 12 hours before proceeding.
Ingredients you will need![Ice Cream Sandwiches]() Ice Cream Sandwiches
Ice Cream Sandwiches![Chocolate]() Chocolate
Chocolate![Ice Cream]() Ice Cream
Ice Cream![Spread]() Spread
Spread![Wafer]() Wafer
Wafer![Wrap]() Wrap
Wrap
Equipment you will use![Ice Cream Machine]() Ice Cream Machine
Ice Cream Machine![Baking Paper]() Baking Paper
Baking Paper![Offset Spatula]() Offset Spatula
Offset Spatula![Cutting Board]() Cutting Board
Cutting Board![Plastic Wrap]() Plastic Wrap
Plastic Wrap![Frying Pan]() Frying Pan
Frying Pan
7
Make your own waxed foil: Of course, you don't have to make wrappers. But it's fun and easy. Simply take a sheet of tin foil, shiny side up, and use a pastry brush or paper towel to coat it lightly with oil. Then press a sheet of parchment paper against the oiled surface of the foil. Use your fingers to smooth the parchment down, pressing out any air bubbles. If you have a bench scraper, that's also a good tool for removing air bubbles.
Ingredients you will need![Cooking Oil]() Cooking Oil
Cooking Oil
Equipment you will use![Baking Paper]() Baking Paper
Baking Paper![Dough Scraper]() Dough Scraper
Dough Scraper![Pastry Brush]() Pastry Brush
Pastry Brush![Paper Towels]() Paper Towels
Paper Towels![Aluminum Foil]() Aluminum Foil
Aluminum Foil
8
Cut the newly formed wax/foil into 7" squares with scissors or an xacto knife. Repeat until you have 12 squares altogether. Set aside until needed.
Equipment you will use![Kitchen Scissors]() Kitchen Scissors
Kitchen Scissors![Knife]() Knife
Knife![Aluminum Foil]() Aluminum Foil
Aluminum Foil
9
Cut the ice cream sandwiches: Pull the brownie pan from the freezer. Run a knife around the edges to loosen, then take hold of the overhanging parchment and lift the whole thing out. It may take a bit of tugging on one side, then the other.
Ingredients you will need![Ice Cream Sandwiches]() Ice Cream Sandwiches
Ice Cream Sandwiches
Equipment you will use![Knife]() Knife
Knife![Frying Pan]() Frying Pan
Frying Pan
10
Transfer this giant ice cream sandwich to a cutting board.Use a large chef's knife to cut it into 12 pieces. It's easiest to first cut it into quarters, then to cut each quarter into three pieces. IWipe your knife clean with a hot, wet towel between slices for the cleanest cut.Store the sandwiches in an airtight container or, to make the most out of your ice cream sandwich nostalgia, wrap each in the prepared foil.
Ingredients you will need![Ice Cream Sandwiches]() Ice Cream Sandwiches
Ice Cream Sandwiches![Wrap]() Wrap
Wrap
Equipment you will use![Cutting Board]() Cutting Board
Cutting Board![Knife]() Knife
Knife![Aluminum Foil]() Aluminum Foil
Aluminum Foil
1
Remove half of the ice cream sandwiches from the freezer.
Ingredients you will need![Ice Cream Sandwiches]() Ice Cream Sandwiches
Ice Cream Sandwiches
2
Place each on the center of the foil or parchment square.Wrap much like you would a Christmas present: fold the long sides to the middle. Then at each edge, fold the short sides to the middle. Then fold the long sides. The foil will crease and stay in place without tape.Return to the freezer, and repeat with the other half. They will keep quite well for about a month, if they last that long, which I doubt.
Ingredients you will need![Wrap]() Wrap
Wrap
Equipment you will use![Aluminum Foil]() Aluminum Foil
Aluminum Foil
Equipment


Ingredients
1teaspoons![baking powder]() baking powder0teaspoons
baking powder0teaspoons![baking soda]() baking soda57grams
baking soda57grams![brown sugar]() brown sugar113grams
brown sugar113grams![cocoa powder, sifted]() cocoa powder, sifted170grams
cocoa powder, sifted170grams![hot coffee]() hot coffee4
hot coffee4![egg yolks]() egg yolks149grams
egg yolks149grams![all purpose flour, sifted (use rice flour for gluten free)]() all purpose flour, sifted (use rice flour for gluten free)2teaspoons
all purpose flour, sifted (use rice flour for gluten free)2teaspoons![instant espresso powder]() instant espresso powder3Tbsps
instant espresso powder3Tbsps![Optional: of neutral oil like safflower or coconut]() Optional: of neutral oil like safflower or coconut2teaspoons
Optional: of neutral oil like safflower or coconut2teaspoons![salt]() salt142grams
salt142grams![sugar]() sugar113grams
sugar113grams![unsalted butter, room temperature]() unsalted butter, room temperature2teaspoons
unsalted butter, room temperature2teaspoons![vanilla extract]() vanilla extract2liters
vanilla extract2liters![vanilla ice cream, store bought or homemade]() vanilla ice cream, store bought or homemade
vanilla ice cream, store bought or homemade
 baking powder0teaspoonsbaking soda57grams
 brown sugar113grams
 cocoa powder, sifted170grams
 hot coffee4
 egg yolks149grams
 all purpose flour, sifted (use rice flour for gluten free)2teaspoons
 instant espresso powder3Tbsps
 Optional: of neutral oil like safflower or coconut2teaspoons
 salt142grams
 sugar113grams
 unsalted butter, room temperature2teaspoons
 vanilla extract2liters
 vanilla ice cream, store bought or homemade
Recommended wine: Cream Sherry, Moscato Dasti, Port
Cream Sherry, Moscato d'Asti, and Port are my top picks for Ice Cream. A common wine pairing rule is to make sure your wine is sweeter than your food. Delicate desserts go well with Moscato d'Asti, nutty desserts with cream sherry, and caramel or chocolate desserts pair well with port. The NV Solera Cream Sherry with a 4.5 out of 5 star rating seems like a good match. It costs about 17 dollars per bottle.

NV Solera Cream Sherry
The Solera Cream Sherry has a brilliant amber and deep copper hue. With butterscotch and pecan aromas, the sweet salted nut and brown spice aromas carry a complex caramel accent. A sweet entry leads to a rounded, lush, moderately full-bodied palate with a lengthy, flavorful finish.DifficultyExpert
Ready In24 hrs
Servings12
Health Score3
Related recipes
Apple and Cranberry Summer Salad
Grilled Potato Skins with Creamy Topping
Garden Coleslaw for 2
Green Bean, Red Onion and Grilled New Potato Salad with Rosemary Vinaigrette
Magazine

Your Inner Chef with Taylor Swift's Top 3 Recipes from Her Beloved NYC Hangout

20 Mouthwatering Recipes You Need to Try Today!

Master the Art of Making Perfect Pancakes with This Foolproof Recipe

The Science Behind Red Wine: Its Surprising Health Benefits and Potential Risks

12 Wine Cocktails for a Sophisticated Twist

Sip, Swirl, and Celebrate: Toasting to National Wine Day on May 25th

National Drink Wine Day on February 18

Celebrating Souffle Day with Delectable Delights

Indulge in the Delightful Flavor of Oyster Soup on Its Special Day!

Celebrating World Nutella Day

How to Make Porridge with Coconut Milk

How to Make Porridge in the Microwave

How to Make Pancakes

How to Make a Romantic Dinner

How to Create a Classic Valentine's Day Menu

What Should I Cook in February?

Valentine's Day - 10 Fun Facts You Didn't Know

Traditional Irish Foods
Traditional Greek foods

Traditional French foods
Your Inner Chef with Taylor Swift's Top 3 Recipes from Her Beloved NYC Hangout
12 Wine Cocktails for a Sophisticated Twist
Celebrating Souffle Day with Delectable Delights
Indulge in the Delightful Flavor of Oyster Soup on Its Special Day!

These Super Recipes for Your Football Party!

The Secrets Behind 3 Classic Comfort Food Recipes
10 Warming Recipes to Beat the Cold Days

A Collection of 15 Noodle Soup Recipes to Warm Your Soul

The Rich and Flavorful Black Food Traditions in Netflix's 'High on the Hog'