Rainbow Layer Cake
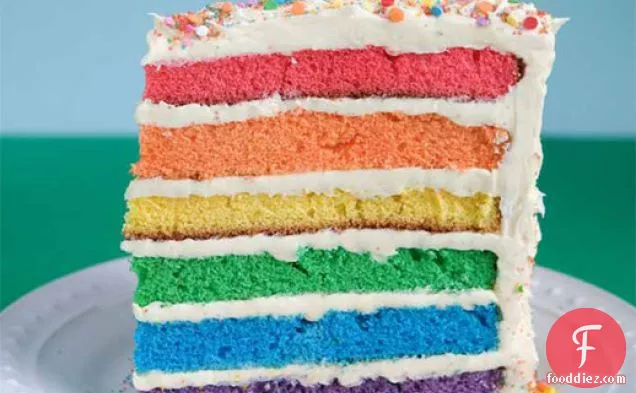
You can never have too many dessert recipes, so give Rainbow Layer Cake a try. Watching your figure? This gluten free recipe has 903 calories, 3g of protein, and 34g of fat per serving. This recipe covers 5% of your daily requirements of vitamins and minerals. This recipe serves 12. If you have butter, heavy cream, cake batter, and a few other ingredients on hand, you can make it. From preparation to the plate, this recipe takes around 4 hours.
Instructions
1
Preheat the oven as specified in your cake recipe. Line six round cake pans (8- or 9-inch) with circles of parchment paper. If you don’t have six pans (it’s OK, neither do I), line as many as you have; you can bake this in a few batches.
Equipment you will use![Baking Paper]() Baking Paper
Baking Paper![Oven]() Oven
Oven
3
Add food coloring to each of the bowls of batter: red, orange, yellow, green, blue, and violet. Be very liberal with the food coloring, as the colors will fade slightly during baking.
Ingredients you will need![Food Color]() Food Color
Food Color![Orange]() Orange
Orange
Equipment you will use![Bowl]() Bowl
Bowl
4
Pour the batter into the prepared pans and bake. Since these cakes are fairly thin, keep an eye on the baking time—it will be significantly less than if you were baking all of the batter as a single layer cake.
Equipment you will use![Oven]() Oven
Oven
5
Once baked, remove the cakes from the pans and set them on wire racks to cool. While you wait for the cakes to cool, prepare the frosting.
Ingredients you will need![Frosting]() Frosting
Frosting
6
In the stand mixer with the paddle attachment, mix the butter on medium speed until it is very fluffy.
Ingredients you will need![Butter]() Butter
Butter
Equipment you will use![Stand Mixer]() Stand Mixer
Stand Mixer
7
Add 4 cups of the confectioners’ sugar, and mix on low speed until smooth and incorporated. Pause to scrape down the sides of the bowl, and add the cream and vanilla. Beat on medium speed until smooth and creamy, 3 to 5 minutes, continuing to add more sugar, cup by cup, until it has reached your desired spreading consistency. If your frosting becomes too stiff, you can thin it by adding more cream, but be careful to add the cream in small (teaspoon) increments so that the frosting does not become too thin.
Ingredients you will need![Frosting]() Frosting
Frosting![Vanilla]() Vanilla
Vanilla![Cream]() Cream
Cream![Sugar]() Sugar
Sugar
Equipment you will use![Bowl]() Bowl
Bowl
8
Using a large knife (preferably serrated), slice the tops of the cakes to make them level.
Equipment you will use![Knife]() Knife
Knife
9
Place the violet layer on a serving plate and top with a dollop of frosting. Do not spread it to the edges, as the weight of the succeeding layers will flatten the frosting. Repeat with the remaining layers until they are stacked from bottom to top: violet, blue, green, yellow, orange, and red on top.
Ingredients you will need![Frosting]() Frosting
Frosting![Orange]() Orange
Orange![Spread]() Spread
Spread
10
To stabilize the cake, place 2 to 3 long skewers down through it (just don’t forget to remove them from the slices when served!). Chill the cake for at least 20 minutes; it will help it firm up and be easier to frost. Using an offset spatula, apply a thin crumb coat of frosting to all of the cake surfaces. Return the cake to the refrigerator for about 30 minutes so that the crumb coat becomes firm.
Ingredients you will need![Frosting]() Frosting
Frosting
Equipment you will use![Offset Spatula]() Offset Spatula
Offset Spatula![Skewers]() Skewers
Skewers


DifficultyExpert
Ready In4 hrs
Servings12
Health Score0
DietsGluten Free
Dish TypesSide Dish
Related recipes
Becel® Roasted Sweet Potatoes with Maple Syrup
Italian Rice Casserole
Turkey Apple Salad Wraps
Becel® Roasted Sweet Potatoes with Maple Syrup
Magazine

Your Inner Chef with Taylor Swift's Top 3 Recipes from Her Beloved NYC Hangout

20 Mouthwatering Recipes You Need to Try Today!

Master the Art of Making Perfect Pancakes with This Foolproof Recipe

The Science Behind Red Wine: Its Surprising Health Benefits and Potential Risks

12 Wine Cocktails for a Sophisticated Twist

Sip, Swirl, and Celebrate: Toasting to National Wine Day on May 25th

National Drink Wine Day on February 18

Celebrating Souffle Day with Delectable Delights

Indulge in the Delightful Flavor of Oyster Soup on Its Special Day!

Celebrating World Nutella Day

How to Fry an Egg

How to Prep and Eat a Cactus Pear

6 Black Food Ideas

8 Healthy Early Winter Recipes

9 Best Winter Recipes

10 Super Cozy Slow Cooker Recipes to Make This Winter

15 Delicious Things You Should Eat In December

15 Easy Potato Recipes

18 Red Food Recipes

20 Winter Dinner Recipes to Fall in Love With
Your Inner Chef with Taylor Swift's Top 3 Recipes from Her Beloved NYC Hangout
12 Wine Cocktails for a Sophisticated Twist
Celebrating Souffle Day with Delectable Delights
Indulge in the Delightful Flavor of Oyster Soup on Its Special Day!

These Super Recipes for Your Football Party!

The Secrets Behind 3 Classic Comfort Food Recipes
10 Warming Recipes to Beat the Cold Days

A Collection of 15 Noodle Soup Recipes to Warm Your Soul

The Rich and Flavorful Black Food Traditions in Netflix's 'High on the Hog'